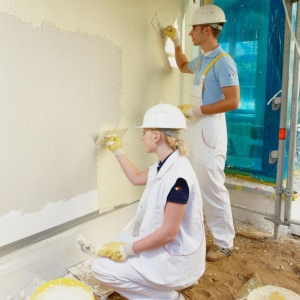
A couple of years ago, plastered walls did not always allow to achieve an ideally smooth surface. Today it is possible to achieve the desired result possible thanks to the use of modern finishing materials and special wall lighthouses, which direct the rule on the specified wall plane. Let's talk about installing beacons under the stucco.
Lighthouse functions during plaster
Recently, under the plaster surface, underrid means were used with which lighthouses were created. For example, plywood or plasterboard sheets, wood rails, rope. Of course, homemade beacons are a fairly budget option, but the quality of work is to improve this way weakly managed. Today, a beacon profile is used for this purpose. Such a lighthouse is a guide made of light metal alloy, the function of which consists in determining the level, to which the plastering solution will be laid. With the basis of beacons are connected with the help of glue or plastering.
The advantages of the lighthouses made of metal are such:
- To install the profile, it is not necessary to invite specialists, all work can be performed with your own hands.
- Metallic lighthouses are not subject to wooden compared to the wooden, so there is the possibility of their repeated use.
The profile is l-shaped and made in the form of the letter "T". It has a length of 2.5 and 3 m, its width reaches 10-20 millimeters, the thickness can be 6 and 10 millimeters. From the last indicator depends on which layer of plaster is required. When choosing beacons, remember that the profile, the thickness of which is 10 mm, is tougher, and accordingly, less begins under the rule. In addition, beacons made from a thin sheet beaches. To achieve hard fastening and prevent displacement, screw screws are used as lighthouses.

Preparatory work
To begin with, we will prepare a tool and devices for further work: level, culma, spatula. In addition, you will need a perforator and 2 rules: the first must have a length that is slightly smaller than the height of the walls in the room, you will scorch the solution.
Carefully examine the walls using the measuring instrument - the level to identify the protruding elements. If the old coating penetrated in some sites, be it paint or old plaster, it must be removed with a chisel. Also remove the influx of the solution to reach the surface plane. Do not forget to predict the walls to avoid detachment of plaster.

Restaurant level of Mayakov
Prepare the surface, exhibit the level for the subsequent installation of the profile:
- First you need to score a dowel in the upper left corner, having to stand it to the end. You can use nails.
- Above the surface should remain part of the fastener, which has the same length, as well as the thickness of the planned layer of plaster. As a rule, at least 1 centimeter, with smooth walls.
- After installing the second nail in the bottom corner. Between them you need to set the vertical using a plumb.
- Similarly, we do with the right angle of the wall.
- Then you need to set the horizontal between the upper and lower nails, as well as pull two ropes diagonally.
- Wavy parts of the wall should not perform above the plane obtained in such a way.
- After you put the level of lighthouses, in the installation sites, spend the vertical lines along which the profile will be installed. The step is 100-200 cm, it should be slightly smaller than the length of the rules that you plan to enjoy when plastering walls.

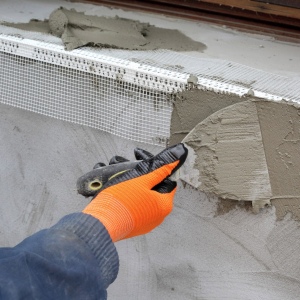
Installation of beacons for special fasteners
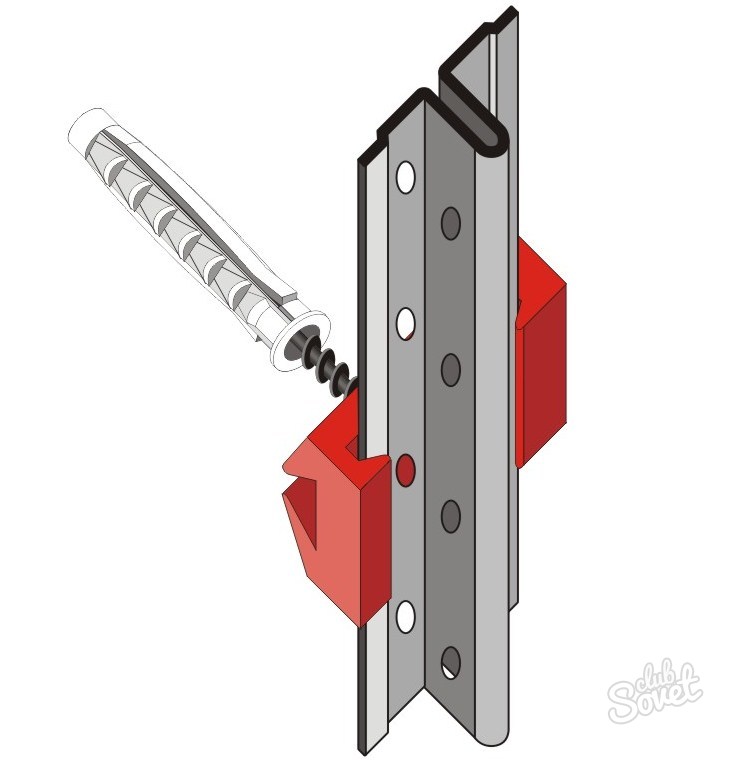
The popular way to place beacons is the use of fasteners - "Eashaustikov" specifically designed for this purpose. A similar device saves consumable material, as it can be reused.
We will get acquainted closer with the procedure:
- Withstanding a step of 300-350 mm, drill along the lines drawn on the surface, the holes where the screws will be installed using the perforator. When working with a wall, folded from loose material, put pressure on the tapping screws.
- When mounting the fasteners of their caps, you need to screw the heads not to the end, set the heads on the same level using a plumb and a screwdriver.
- Exposing the self-tapping screws, remember the purpose of work, which is to achieve the minimum possible thickness of plastering and saving the solution, unscrewing or spinning screws.
- In some cases, it may be necessary to install additional fasteners.
- Further attach on the mold screws for lighthouses. To fix one profile at the height of the walls in 2.7 m, 7 "ears" are used, which are installed using special rounds.
- At the constitutional stage, lock the profile itself in the fasteners.
Installation of beacons
There are 2 ways to fasten the beacons per solution:
- Throw the solution on the surface along the line, along which the profile will be attached. The layer should turn out more than with the subsequent wall shuttering. Attach a lighthouse to a solution, drowned in it below the thread level of about 1 millimeter.
- Cut the extreme lighthouses so that they can fit between the nails in the corners installed at the first stage. Then it is necessary to throw the solution under them and drown a lighthouse to the level, which these nails are installed on. To do this, use a rail that has a big length than the beacon himself. Calculate the beacon stop when the rule will strengthen in any of 2 nails. After installing intermediate beacons.

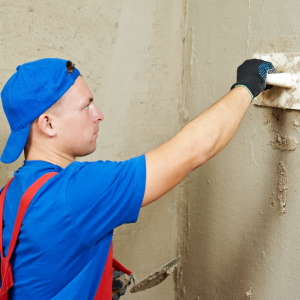
Plaster for beacons
Now the wall is considered to be prepared for shuttering:
- Sketch the solution using Kelma. It should be located between beacons.
- After filling out the part of the wall, align the plaster using the spatula for the beginning, and then a short rule. You can also do without rail, but get ready for more hard work and loss of quality in this case.
- Press to the lighthouses rule, based on them. The tool must be promoted in the bottom upward direction. Perform reciprocating movements to dissolve the solution. If there is an extra mixture, remove it with the ruler with the spatula.
- Gradually move between beacons to shock the entire work surface.
- The drying time of the solution depends on the properties of the mixture itself. It also affects the temperature that was established indoors. When the wall hardens a slightly, without waiting for its absolute drying, you need to extract the beacons, first throwing off the bottom edge of the profile.
- Then you should close the deepening solution that remained after the lighthouses.

You can start a couple of days after plastering the surface, thus reading it using an abrasive mesh.