Window replacement is accompanied by sloping finish. Specialists are engaged in the installation of plastic windows. Sometimes the windows are put independently, and the plastic panels do not like everything. Although they are cheaper and easier in the installation, they have and disadvantages. Plastic is easy to damage or stain, and these are new costs for replacing a whole panel or slopes. There are no such problems with drywall, and the holes are plastered.
1
Plasterboard - the most suitable material for window, door and balcony openings in the apartment. Plastic slopes on the windows on the south side overheat and give evaporation. Plasterboard - more suitable material, especially if traditionally preference is given to the windows of wood, the installation is fast and accessible by technology.
2
The material is available at a price, and the defects on its surface it is easier to eliminate. On scratches or potholes, just put the usual putty and update.
3
Plasterboard or GLC contains a dense cardboard and a gypsum core, refers to the number of eco-materials, allergy preference is preferred. Finished slopes have aesthetic appearance, they are durable, do not require care and serve as an additional insulation of windows.
4
GLC has 2 varieties - ordinary and moisture resistant. Moisture-resistant HCLV is resistant to condensate, goes to the breakdown of slopes. GKK requires additional processing composition to protect against moisture and fungi.
5
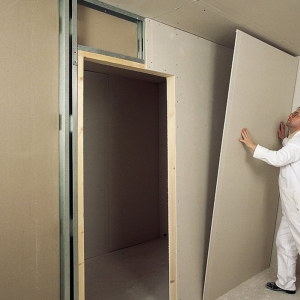
If you are interested in how to make slips from drywall yourself, do not doubt what happens. This is a simple process, if there is a reservoir, work skills and accessible instructions. Prepare a stepladder, tools, plasterboard. Also need:
1.5-2 sheets of G CLEB;
P-shaped plastic profiles;
primer;
mounting foam;
glue for plasterboard, acrylic sealant;
construction knife or saw;
roulette, plumb, level, marker;
roller, spatula and painting tape;
screwdriver;
mineral wool or filler for large voids.
6
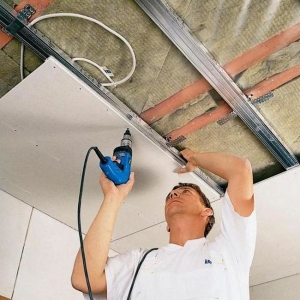
The first stage - the window can be cleaned from the remnants of the construction garbage or old finishing materials. Remove the remnants of wallpapers, old plaster and paint. Surface surfaces are soil and leave to dry up the installation according to the instructions. An additionally applied the mounting mesh on glue and rejected onto the ground surface. Make measurements of each surface, marking and cutting GCL. Significant building emptiness fill with mineral wool and fix the mounting grid. Sometimes gaps and emptiness close up with mounting foam, but at least not to cut.
7
After cleaning the surfaces at the junction of the frame and the window opening, make small gutters for P-shaped plastic profiles, where plasterboard will enter. The profile securely fix the screwdriver into the grooves on the windows along the edges - it will make it easier for the installation of Clev segments. P-shaped can be replaced by L-shaped. Sometimes the edges of the slopes should be adjusted using perforated protective corners and plaster powders.
8
In the resulting frame from profiles will be sliced \u200b\u200bbands of the GCCV. Follow the accuracy of cutting, useful 2-5 to give a margin and correct. The error of measurements for smooth slopes on profiles and plasterboard minimal. On an uneven construction surface, noticeable deviations may form. They are tested by plaster, and a large inconsistency will have to close the profile.
9
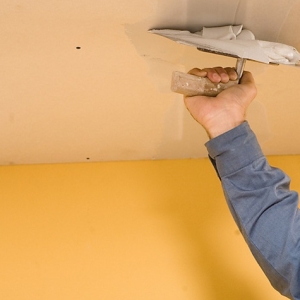
Window at the installation time Close the film by fixing the painting ribbon. We are trying on cutting drywall. In the grooves where the segments of G Clac will be inserted, we apply acrylic glue. The first mount the sidewalls, then the upper horizontal. We divorce the glue in the bucket to the thickness of sour cream, can be a construction mixer. Do not make a lot, building mixes are quickly set.
Finished glue with a spatula on the surface of the slopes of the window. The sidewalls of plasterboard put in the groove, fix the self-drawing and check the construction level. You can make an installation on a foam, without glue, but you need a little, so as not to cut the sidewall. When everything is aligned, kpripim plasterboard with self-drawing to the wall. Surface plaster and cook in painting.