Consider the order of structures on the wall of the frame of the frame of metal profiles intended for plasterboard sheets.
Tools and materials
The paper uses a set of tools:
- Roulette;
- Plumb;
- Level;
- Pencil;
- Rope;
- Drill or perforator;
- Metal scissors;
- Pliers;
- Hammer.
For making framework prepared materials:
- Profiles guide and ceiling;
- Sealing tape;
- Dowel or self-tapping screw - depends on the material of the wall;
- Suspensions, connectors longitudinal and crabs;
- Screws self-refined.
Before work, free the mounting zone: remove any protruding parts and remove the finishing layers. A strong plaster can be left on the wall, making a sample to the base at the points of fastening the suspensions.

Marking circuit carcass
A flat design plane provides the correct markup performed according to the following procedure:
- Using a plumb or long level, find the most protruding wall.
- From the found place strictly vertically transfer the label to the floor.
- Recovering from it inside the room of 30 mm, mark the point.
- From the opposite edge of the wall put the second risk on the floor, given the thickness of the profile.
- Conduct a line through marked points.
- Using a plumb on the ceiling, a mirror reflection of this feature is performed.

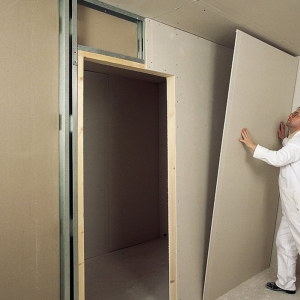
Installing starting profiles
Sliced \u200b\u200belements are installed according to the markup first on the floor, then on the ceiling. There is a sealing tape between the profiles and surfaces of the walls, the ceiling and floor. In the fixed guides, side parts of the frame are inserted and fixed by their dowels.

Installation of racks Karcasa
The carrier profiles on the height of the room minus 10 mm are harvested, measuring in several places walls. Retreating from the angle of 1200 mm (sheet width gypsOwlock), put a point on the lower guide and carry it with a plumb on the ceiling profile. According to these risks, there is a carrier rack, checking the coincidence of tags and the profile axis. Exhibit the next guide for the size of the sheet and intermediate with a pitch of 40-60 mm. Frame details are screwed by self-drawing. Install brackets, flexing the plates of the letter "P" and fixing them only to the wall.

Alignment of the frame of the carcass
Frame racks to the plane are produced in a certain order:
- With the help of nails, inserting them into the holes of the suspension, each carrier profile is pressed to the wall.
- Between the side guides stretch the twine, which should not touch the vertical racks.
- Having pulled out a nail from the bracket, supply the extreme profile to the rope is almost close and fixed with its screws.
- Similarly, all the racks alternate alternately.
At the end, the flatness of the plane is checked in all directions and, if necessary, corrected, twisting the screws.

Installation of jumpers and placement of hidden elements
Scrolls are installed by means of angular connectors. The first mounted jumpers at the joints of the plasterboard sheets, the rest are uniformly distributed after 50 mm. At this stage, communications are also carried out (air ducts, wiring), establish reinforcing elements for hinged structures and lay insulation.

The task is made - the design is ready for lining with sheet material. After mastering the technology on simple facilities, boldly begged to more complex projects, for example, make shelves made of plasterboard.