Nowadays, there are many electrical appliances in every home or apartment, and if the house is new, then the wiring in it is in good condition. In the old buildings, it is often in an emergency and pre-emergency condition, because in the old days it was laid out without current capacities. In such cases, the old wiring must be replaced with a new one. We will tell you how to change the wiring yourself. The advantage of this choice is that you save decent money and be able to control your work.
1
First you need to make a scheme of the future power grid, make marking on the walls where sockets will stand, switches, lamps. Think up immediately and network communication, as well as antenna cables. Perhaps they will then be combined with one patch decorative panel. After the markup is made, make a consumable estimate. Consider how many outlets, switches, cutting machines, the lamps will need. The wire does not necessarily take one section. On the power network, apply D2.5mm, and on the lighting - enough D1.5MM. Wire, naturally, use copper wiring for wiring. If the apartment or a house of stone, then the cable can be taken in one insulation, and if there are wooden structures or it hides under drywall - better in double.
2
After the purchases made, you can proceed to work. It is not necessary to extract the old wiring from the walls, you can leave it, you only need to turn off. According to your scheme, let's run special grooves (shoes) to bookmark the Wire. Tool for punching use different. It all depends on the material of the walls. Sometimes there is enough hammer, and sometimes Bulgarian is required with a perforator. Two parallel cuts of 20 per 1.5 mm and the middle between them are knocked out with a punch with a perforator. Shorts should be strictly horizontal and vertical. Snacks for distribution cuts, sockets and switches make a special crown-crown with winning attacks, which is used with a drill or a grinder.
3
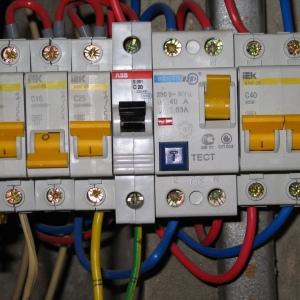
One of the important works is considered to install and connect the distribution shield. First, make a niche in the wall, install and secure the shield. Then install the main machine and the meter. After the counter, be sure to attach the RCD. This device disables the network if the leakage current has appeared. After the RCO, set the automatic protection groups for lighting and sockets. Sockets of one room put on one automatic 16a. Room lighting can be connected to two or one automatic 10a. Connect from the Uzo phase wire to the inlet of all machines with a loop, and zero - on the first terminal block, the protective wire is on the second terminal block. The first and second pads should not be connected.
4
Next, lay the wire on the stroke from the machine to each room to the distribution unit. It is possible to fix it with alabaster, it is quickly grasped, so it is very convenient. The wire must be three-core. In each room, lay the wire from the distribution cutting to the outlet, switch and lamp. In the camshafts, make wire connections. Now the veins are marked in color, and it is not difficult to do it. The wires from the sockets are connected in parallel, and from the switch and the lamp - consistently, and then connected to the input. In the camshafts, the scrubs are better not to do, but to use self-sufficient terminal blocks or, if you still have made a twist, they need to be sued, and put on the connections to wear protective caps.
5
Switches are set at an altitude of one meter near the door, and the outlets are thirty centimeters from the floor. First makes the box and the wire will start in it. The socket itself or switch are attached in the box using sliding clamps. Nearby can be put a few sockets and combine with one patch decorative panel. For the bathroom use special waterproof sockets and lamps.
After completing the work, the network is to test for the absence of short circuit, and if everything is done correctly - you can turn on the current.


Good article +100