Without communication systems, no room is required. Most often, old water and sewer pipes spoil the view of the bathroom. Therefore, most owners try to find a solution for their successful disguise and with this unimpeded access to the system at any time that does not imply a dismantling system. Along with the installation of rollers or climbing of communications in the wall, it is advantageously allocated to make a neat folding box for pipes.
Functions Koroba
Before installing the box in order to hide unsightly pipes, it is necessary to determine if this design will close only communications, or you want to sew the entire wall on which they are installed. Most often give preference to the first version: and the material saves, and the area of \u200b\u200bthe room is not reduced. In a pipe box, it is convenient to equip small storage facilities for small items, such as products and girlfriends for cleaning the house, unnecessary trifles that are sorry to throw away. Material for creating a box should meet such requirements: to be moisture-resistant, easy, having a small thickness, do not evaporate harmful substances into the air when the temperature jumps. Under these criteria, such materials are subject to MDF, moisture-resistant plywood, plastic and moisture-resistant plasterboard. However, the most suitable is the last option due to the ease of its processing and different ways of finishing finish.

Preparatory stage
First of all, when installing a box of pipes, it is recommended to adhere to these rules:
- To begin with, carefully inspect the surface of the pipes for the presence of all sorts of defects and, when discovering, eliminate them to avoid leakage.
- The compounds formed by soldering or welding can be closed without any concerns, and the fittings with thread can not be tinted.
- Remember that free access is required for a periodic inspection to valves, filters, sewer audits and counters.

Tools and materials
For the manufacture of a box, prepare a tape measure, a hammer, drill, perforated corners and a knife. Do not forget the measuring instrument - plumb and level.
It will take one sheet of moisture-resistant drywall of standard dimensions 2500 * 1200 mm, which has a thickness of 9 or 12.5 mm.
For frames, wooden bars (40 * 40 or 50 * 50 mm) are used, previously treated with antiseptics and a wood primer, or a galvanized profile that is more practical in this matter. If you have chosen metal priority, prepare the UD guide profile and CD to form a frame.
The fasteners are the dowels, euroschauses and self-tapping screws.

Marking
Production of a box for pipes begins with marking on the floor:
- First, the contour is denoted to install the guide profile or bars. Consider that the actual sizes of the box differ from the laying on the thickness that the sheet of plasterboard has.
- All lines must be perpendicular to each other, as well as to the wall, use a construction corner for checking.
- When marking, do not forget that the design should not be adjusted to the pipes. It is necessary to withstand the gap of 3-5 cm on each side.
- In addition, the width also affects the material that will be used for subsequent finish.
To transfer the markup to the ceiling, use the plumb, and for marking on the wall - the thread stretched between points designated on the floor and the ceiling.

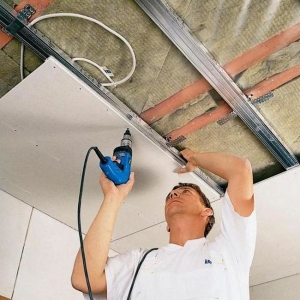
Mounting carcass
When fixing the framework elements, use this instruction:
- Install the items near the walls, whether it is a profile or bars.
- Then the front edge of the box is made by installing one or two racks.
- When installing the box with a width exceeding 25 centimeters, or if its height is more than 1.5 meters, it is recommended to make jumpers between supports. The distance between them should be 1 m.
- Applying a wooden bar, compulsory process cuts of wood mastic cuts to protect wood, ensure noise insulation and lack of a violep with thermal deformations.

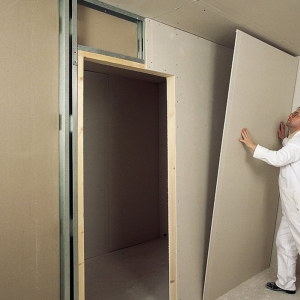
Fastening of plasterboard
Plasterboard sheets are fixed in such a sequence:
- First you need to cut the material so that the box turns out to be monolithic. For its manufacture you can not use pieces.
- Cut the stripes that side face will be shifted. Ensure that the bandwidth corresponds to the width of the frame. Strips should not perform for support racks.
- The front line is cut on, so that it overlaps a bit and the side stripes.
- Sheets to racks are fastened with self-draws, while it is recommended to withstand a step at 15-25 millimeters. But to jumpers located between the racks, you can not fix.
- After you secured sheets, you should sharpen the hats of the screws and form the corners of the box and places where it adjoins the walls, with a corner made of metal or plastic.
- Then apply the finish putty.
- Now we go to the facing of the surface, for which you can use ceramic tiles.

Actually, on this construction of a box of plasterboard sheets is considered completed.