Each time, clutch repairs, we sincerely think that now everything will be simple and quickly, but in any case there are some delays, problems, etc., especially if you decide to repair yourself. Let's see today, as you can, with your own hands, without any assistance to wove the plasterboard under the wallpaper.
Repair nuances do it yourself
Of course, no one can argue that order such a servant as "turnkey repair" is very convenient. Only imagine, gave instructions to the workers, you come to the specified period - the repair is made in the house or apartment, the option is perfect, but, as in any other situation, there is a lot of nuances and the most important of them:
- The cost of such a service is extremely high for any average citizen with an average earnings

- Not always workers turn out to be professionals, and money can be spent in vain
- Not all the details can be made as you wanted to (happen so can for a variety of reasons, which can be infinite)
- In general, if you decide to repair yourself, then you need to know all the details of this process. Today we consider in detail how to put the plasterboard to shove on the wall or ceiling after that.
- The fact is that in most apartments and houses that were built several decades ago, the walls are very uneven (and it is still gently said). In each second apartment on the ceiling and walls, a huge seam is visible and there is a plate of plates, so make the perfect repair in such premises without the use of drywall, it is almost impossible (if you are not ready, of course, to throw several tens of putty to the walls).
Despite the fact that drywall is additional costs, but at the same time, it is the most optimal and most profitable option to make your walls and ceiling as smooth and ready for the perfect shook wallpaper.
The process of putty under the wallpaper
Immediately I would like to note that the process of putty under the wallpaper or for any other coating is not particularly different, but at the same time, though there is something differences. It is them necessary to disassemble more, in order for this process to have passed without problems:
- First of all, you can not put the entire surface, but to apply a layer of putty on the seams between the sheets of plasterboard, it will save both the time and the cost of putty.
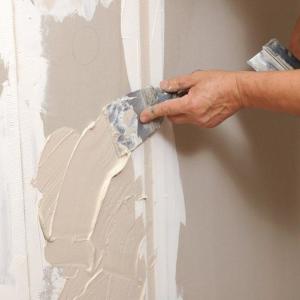
- To stick the wallpaper on plasterboard, a uniform and not a thick layer of putty is applied to it. The keyword in this case is evenly. The optimal option is a layer of putty should be no more than a millimeter. The main goal to make the surface as it can be smaller.
- Some suggest that wallpaper can be glued directly on the raw gypsum and stick they will be very good on the wall. The fact that they will hold tightly, no one argues, but the time will come when you want to change the wallpaper and there will just have problems - you will not be able to contempt from the walls and have to glue the wallpaper on top of the old. It should be understood that inside the sheet of plaster, and from above - cardboard and paper to paper lipnet very well.

- So, it is more profitable and easier to buy several buckets of putty, which then change the pieces of drywall, where the coating will be completely spoiled.
- Before applying putting on the wall, it is necessary to remove all unnecessary and unnecessary parts from its surface - pollution, dirt residues etc.
- The next stage is degreasing the surface to which one is going to put a putty. To do this, it is better to purchase a special composition, the main task of which is degreasing surfaces. Apply such compounds is better than a roller, and it is necessary to do this in one layer.
- Now we also apply the primer, too, a small layer, and only after this layer is driving, you can put a putty. Among other things, the putty is applied to the surface at temperature indicators not lower than 5 degrees of heat.
For the process under consideration, such tools will need:
- spatula wide
- narrow spatula
- corner spatula (in order to be easier to handle spacing angles)
- abrasive grid
- drill (simplifies the entire process of putty)
You can buy ingredients individually for the preparation of putty, and so, there is another option - buy putty in the finished form.
If you purchased a mixture in a dry form, then it will be necessary to breed it with water. Preferably heated (the proportions will be indicated on the package). All other nuances of using this or that type of putty are also listed in the instructions on the package.
It should be immediately noted that it is not necessary to save on the purchase of putty, because here is the current proverb - "the miser pays twice." If you want a putty to be applied to the walls, then buy a mixture of high quality.

Tips from specialists:
- Divide a little mixture. Better after you are over the cooked putty, make a new one, so as not to spend the mixture by back.
- Putchal dries quickly enough, so long to wait until it freezes, do not have to.
- To the places where bolts or self-tapping screws are screwed, several layers of putty should be applied.
- Excess putty should be removed from the wall soon after applying. Do it better than a special abrasive grid.
- It is not necessary to glue the wallpaper immediately after applying putty, wait until the coating layer is completely dry.
The process of putting the walls is simple, the main thing is to know all the nuances and details of this process. All of them are described above in the article.