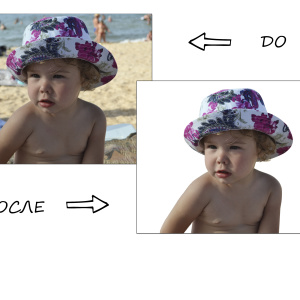
If you want to get beautiful photos with a blurred background, which makes expensive optics for professional photographers, then it is better to use Photoshop. This article will present two ways to make a beautiful blurred background in the photo using this program.
How to blur the background in photoshop: the first way
The first way will be much easier for the second, but it looks less efficient and suitable for large objects and clear lines. If the model in the photo dispels the hair, then it will be difficult to realize this plan.
So that the blur looks natural, you need to remember some principles of focal planes:
- The main object in the frame always remains clear and sharp;
- Objects are blocked stronger if they are removed from the object. All items next to the object of shooting are blurred less.
Go to photoshop and open the photo. Now you will work with tools on the left pane.

Lay out the "Blur" or "Blur Tool" tool. It will be represented almost in the middle of the panel and is denoted by a droplet.

You need to configure the size and intensity of the tool. From above, you will see the string "Strength", put the slider in it by about 70-80%. Specify yourself, depending on your photo.

Start drawing a tool around the main object, try not to touch the model. If required - Increase the image and work gently.
As a result, you will have a soft blur that does not hurt the main object.

How to blur the background in photoshop: the second way
With the first way of execution, you cannot specify the direction of blur, and if you are still poorly wearing a tool, then work may turn out to be neakkurat. So that everything looked more professionally, try to resort to the "Feather" tool.
Pay attention to the left part of the toolbar, click on the pen.

This tool is pretty simple in control, it is only a bit straightening. You must put points, and then bending the line of them. Circle in this way all your model in the frame.

Once you finish and close the chain - right-click on the contour. In the pop-up window, select the "make selection" or "selection" string.

In the window that opens, set the value "0" and click "OK".

Now pay attention to the right side of the program. You need to remove the lock icon from your layer. Just click on the icon once.

After that, take another tool on the left side of the screen. It is called "allocation". Press again along the contour right-click and click on the Layer Via Cut string.

Immediately, you will have a second layer on the right side of the window, go to the lowest, simply by clicking on it with the mouse.

Then click on the "Filter" or "Filter" menu, in the drop-down list, click "Blur" or "Blur". Now you have to choose the type of blur. They differ in direction, for example, you can make a light blur of the background in motion up or sides, which will add the dynamics frame, and the usual blur without any movement is called "Blur over Gauss" or "Gaussian Blur".
On the same example, "RADIAL BLUR" or "Blur in a circle" will be applied to the edges of the photograph beautifully twisted around the model.

Blur value Set 1-4, depending on your goals. If you want a soft blur, then 1 or 2 is quite suitable.

Consider how the background on the sides is now twisted into the ring. You can only adjust the photo.

Finish editing by making color correction and any artistic effects. So that the blur looks more naturally, you can take the "Archive Brush" tool and return some elements around the model to a sharper mind.