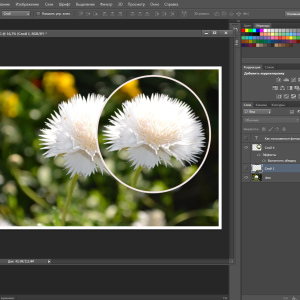
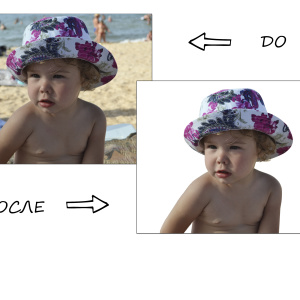
Thanks to the multifunctional Adobe Photoshop CS6 editor, adjust the portrait photoomics if it needs it is completely easy. For example, improved skin texture and remove the second chin by means of the tool palette - step-by-step instructions to help you.
1
Open the selected image in Photoshop - click on the photo of the right mouse, select the item "Open with" → Adobe Photoshop CS6. Starts the editor installed on the PC, and with it and the selected photo. How to install the program - read here.
2
To begin with, a little improved the original image and thereby contribute to a more thorough removal of the second chin. Create a duplicate layer - turn to the "Layers" palette, right-clicking on the background layer and choose the item "Create a duplicate layer ...".
3
Slimming skin texture with blur - Select the "Filter" tab in the main menu → "Blur" → "Blur in motion".
4
Apply for a blurred layer a black mask - holding the "Alt" key, click on the "Master" icon. Next, take the "brush" tool of white, as the most soft, and it will begin to show blurry areas of the skin. We draw in the black mask mode with a white brush, but adjust the unnecessary - black tassel, which also choose the colors on the palette.
5
To give the skin more natural form - reducing the parameters of opacity or fill the layer to 60%.
6
Also add some noise so that the skin texture does not like a glossy cover. We go to the "Filter" menu → "Noise" → "Add noise ...". Expose the effect parameters - 1-1.5%, but not more.
7
Create a duplicate layer again and connect copies of the background in one layer. To do this, turn off the "background" - we will remove the Zlazik checkbox from the layer. Next, combine visible layers.
8
We go into the plastic window to finally get rid of the second chin. Select in the "Filter" → "Plastic" in the menu. Running the snapshot with the help of "+" and "-". Activate the "Deformation" tool and make it with its help an excess chin area up. For more detailed deformation, change the parameters of the brush. To return to the original picture, use the reconstruction (the brush icon with points).
9
We will make a smoother transition from the chin to the neck - activate the "Patch" tool, outline the fold and dragging it by holding it with the mouse to the clean region.
10
For shallow reties, take the "stamp" tool and highlight them a clean area - holding the "Alt" button by clicking the mouse. We transfer it to the texture that requires adjustments. To increase the photo, turn to the slider on the "Navigator" palette.
11
If you want to finish the retouching of the photo using the "Correction" palette, we will subscribe a bit if necessary, brightness and contrast, we use a photo filter. Save the image "Ctrl" + "s" in the "JPEG" format.
To cancel editing, a combination is pressed: "" Ctrl "+" Z ", reset photosop settings - when the program is started, the" Ctrl "+" Alt "+" Shift "keys hold.
Share advice:"How to remove the second chin in photoshop"