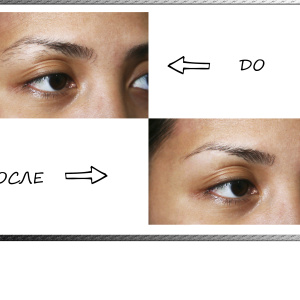
The human face is rarely ideal and it is especially striking in the photo. Let's use Adobe Photoshop and remove with a digital photograph of hated cosmetic skin defects - acne.
1
If you want to get rid of acne on the photo, you need urgently, but on the computer, the multifunctional image editor is not installed and absolutely no time to download it - refresh the person through photoshop online. Go to site, Following Internet service prompts, download the image from the PC and you can immediately start editing.
2
Close the problem area as much as you need with the navigator palette. Select "Point Correction Tool" and decide on its size. Select pimples using a corrector, but do not hurry, and work painstakingly - a relatively clean face after 30 minutes will appear before your eyes.
3
Save the resulting photo on your computer by the file "File" → "Save" through the main menu or the key combination "Ctrl" + "S".
4
If you failed to achieve the maximum retouching effect through online photoshop, and there is a lot of free time and a great desire to master Adobe Photoshop PS - download the program through any torrent resource. Install and run it directly on your PC.
5
Open the photo editing using the file → "Open" command or the "Ctrl" keyboard buttons. Increase it for a clear visualization of problem places through the Navigator palette. It opens in the Photoshop working window through the "Window" menu → "Navigator".
6
Activate the "point" or "restoring brush" on the toolbar. Increase it using a curly bracket on the keyboard). For example, restoring a brush to install in the area of \u200b\u200bclean skin. Click the "Alt" mouse - release the button and move the target circle to the pimple place. Pick up directly to a defect. If you did everything right - the skin will become a little cleaner. Do similar actions on all problem areas of the face.
7
Experiment similarly with the "stamp" instrument or experience your strength with the help of "patch", outlining it with a closed line around the pimple and dragging it to the next area. True, these tools are a bit more difficult to use, but the effect is obtained more efficiently several times.
8
Complete the retouching photo using the colors palette, improving the "Color Balance" - Moving the flags to the left and right. If necessary, adjust the contrast and brightness of the photo. Save the image through the menu bar in the file "File" → "Save" or "Ctrl" + "S".
Before using Photoshop, make sure whether the Flash Player is installed on the computer - it is needed to work in an online editor, and whether there is enough space on your hard disk - uninstalled Adobe Photoshop PS consumes a lot of computer resources.