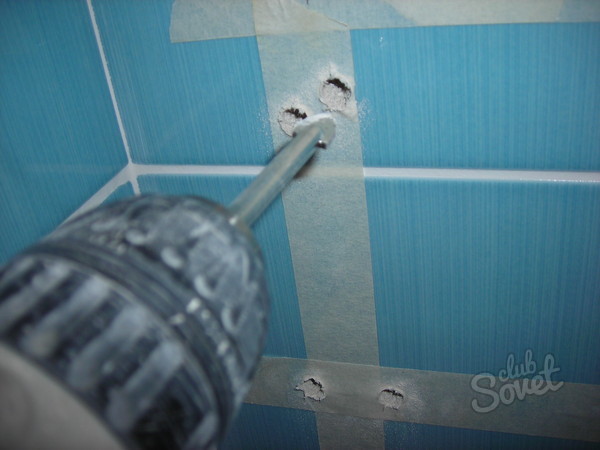
After the completion of the repair work in the bathroom or in the kitchen there is a need to drill a tile for complementing the room with all sorts of cabinets, towel hangers, shelves and mirrors. You also have to make holes in the walls for plumbing pipes, wires and cutting outlets. It is important to know how to drill tiles, and act gently so that the material does not split.
The tile is a solid material, but its upper layer is inherent fragility, it often appears for inaccurate treatment, cracks occur. This should be considered when working with it. When choosing a tool, it is recommended to adhere to the following tips:- To create a hole of a small size in the tile, it is customary to use a manual drill. With it, it is easy to change the speed of rotation, controlling it at the same time, and follow the indicator of the press force. If necessary, you can apply a screwdriver, but exposing small revs. The absence of sharp jerks is the pledges of high-quality drilling, in which the material is not cracking.
- Impact tools, such as a shock drill and a perforator, can be used when you completed the creation of the hole in the tile and started the trick of the hole in the wall.
- Selecting the drill, give preference to the cutting edge, which is more solid than the surface of the material. For small holes, drills that have a spear tip and winning attack, for essential work - drills on which there is a diamond spraying.
- Large holes for the mixer, a pipe or a rosette are made using a "crown", which is a tubular drill on which there is a diamond spraying. Such a drill allows you to make holes whose diameter is up to 150 mm. At the same time, the drill is installed on the minimum number of revolutions.
- Drill the tile can also be used with a carbide milling cutter, which also copes with stone and concrete. But it is inherent in one significant drawback, namely a fixed diameter that cannot be adjusted.


- Before the direct drilling, let's light on the cafes and appreciate the resulting sound. If he is deaf, then feel free to start work. In other cases, the tile can split.
- Plan the number of holes and location of their location. Do not drill at the edges of the tile, in the crosshair. The same applies to the gaps that are formed by adjacent tiles. In this case, there is risk of chips and cracks. Put the marker tag.
- When drilling it is important to prevent sliding drill on a smooth surface. To do this, in the value of the alleged opening, it is possible to beat the enamel slightly, using a file, a hatched self-tapping screw or drill on small revolutions. At the desired area, glue the tape (the painting tape is suitable, the leukoplasty) to keep the drill. The label should be watched well in this situation, otherwise, make a mark directly on Scotch.
- In addition, to prevent sliding, it is customary to use the conductor. It is a peculiar stencil, a thick steel or wooden plate, which has a holes of different diameters. Having approved the conductor to the cafée, drill through the hole present.
- Start drilling tiles at right angles. Press the tool is necessary with minimal strength, otherwise you can break the tile. Work on low revs so that the vibration and backlash drill are less, gradually increasing the speed to medium revolutions.
- Periodically spray the tile, wipe the drill, having turned it off before it, since with excessive overheating at the site of drilling the tile is capable of cracking.
- Folding dust must be immediately removed using a vacuum cleaner. Better if your assistant will deal with.
- When you get to the wall, it is recommended to change the drill to suitable, depending on its material - wood, concrete, and turn on the impact mode. The diameter of the second drill should not be greater than the first. Otherwise, the tile may damage. Record neatly on medium turns.
- Before drilling a tile, which is not yet laid, withstand her half an hour in the water, then place on a flat surface - wooden or concrete. It is impossible to place on metal, otherwise spoil the tool. The hole is recommended to be done from the unhappy side, tight holding the tile.

That's all! It remains only to rejuvenate the scotch and insert a dowel. And do not forget to use protective glasses to prevent fragments and dust in the eyes!


