The construction of the bath is completed by the construction of the roof, which protects the structure from atmospheric precipitation and wind, and also performs aesthetic function. For hygiene structures, as a rule, choose simple structures that have low weight, without numerous frontones, fesomes and delights, so build the roof on the bath will be carried out personally.
Features of a bath roof
The roof consists of several basic structures. The first of them is a rafter system. The second focusing, which is represented by crate, waterproofing, thermal insulation and roofing material. Another structural element may be an attic overlap, but it is not always built. The roof with the attic looks attractive, and also has good thermal insulation indicators. The roof that does not have a attic is designed for baths that are planned to be operated mainly in the summer.
The roof has one or two slides:
- A single-piece roof is chosen for a bath that adjoins the house, small summer baths, or if the owner wants to reduce the cost of construction work. The height of the roof, which has one skate, is not regulated by any requirements, but mostly such roofs are erected almost flat.
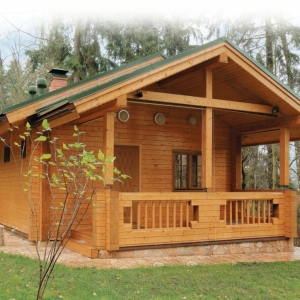
- Duct roofs are considered a more common option for log canoes built in the form of a separate building. If the rods have sufficient height, under the roof you can arrange a full room for accommodation. The steep bundle roof is determined by the aesthetic wishes of the owner, but climatic features should also be taken into account.
The angle of inclination of the skate
The slope slope can vary widely - namely 2.5 to 60 degrees:
- With a larger coal, the precipitation is better rolled from the planes.
- For the bathing an extension, its value is selected, depending on the materials used, and is 50-60 degrees.
- If strong gusty winds are dominated on the ground, then the high design will not be acceptable, in this case the roof is worth making a flat to eliminate its damage to the wind.
- In the regions where abundant precipitations are observed, the approach is optimal at an angle of 45 °, so that snow masses did not accumulate on the roof.
- The slope slope also depends on the chosen roofing material: metal roof - 15-27 °, slate - 27, rolled materials - 3-15 degrees.
- For the roof without a attic angle can be no more than 10 °.
Installation of the rafter system
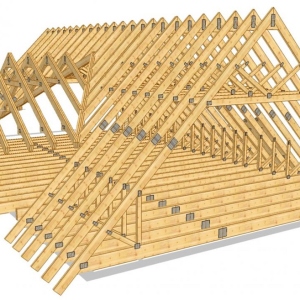
Regardless of whether they collect a rafter farm on a shrub of a bath or on Earth, it will consist of several parts:
- Slinge foot. This is a board, which has a length of 2.8 m, its cross-section is 100x40 millimeters.
- The base that is represented by the edged board. Its length is 4.4 m, the cross section is similar to the rafter foot.
- Rigel. The edged board, which gives the design additional rigidity, should be located 0.5 m under the joint, where the legs of the rafter come into contact.
The boards that you will use during the work should be trimmed at an angle of 40 ° and begged screws. After completing the assembly, install the design on the walls of the bath, and you can start making the crate. Depending on the roofing material used, a doomer is required, made in the dispersion (hard material, such as metal tile and slate), or a solid base (for a roll roof). For the crates, boards are used with a thickness of at least 2 cm. The frame will turn out to be stronger if you take the boards of a long length, as the number of seams on the joints will decrease. However, if a large number of seams are foreseen, then try not to place them on the same level using the boards with different lengths.
Instructions for the construction of a bath roof
Building a bath roof, perform our instructions exactly:
- The beams should be located on the walls on the walls. They perform the function of the roofing design. With the future construction of the attic, lock the overlapping beams in the nest. If, when checking the horizontal beams, you found that they protrude beyond the walls by 50 cm, then pillars should be installed under them.
- Install the rafted on support. Between them, the distance is withstanding, which is at least 1 m.
To fix the rafter uses overlays made of wood. You can also use brackets made from metal. - If further laying of the rolled material is planned, make solid flooring, applying wood for this. For a hard coating, another base is needed - a doom made from the board.
- Close the horse using the billet made from asbestoscertic or metal. Boards are suitable for the coating of the frontones. Depending on the taste of the owner, you can choose another material, for example, lining or siding.
- In the case of construction of a bath with a attic, leave in the ends of the openings for the door and windows. They can be located on the one hand or to be from different ends, depending on what the angle of inclination of the roof is. If the roof is common, then lay the window and the door on different sides.

The heat insulation of the bath roof
The thermal insulation material can be located between the rafters. Also allowed under this design. Regardless of the material, it should be located close, without the formation of cracks in places where its pieces are joined with each other, with pipes, walls and present in the bathing elements. Be sure to leave the layer between hydro and thermal insulation, the thickness of which should exceed 2 cm, and make sure that the waterproofing does not sag. Since the attic space is reduced due to laying material, it is necessary to have it above the bars.
Coating a bath roof
The procedure for mounting roofing material Consider on the example of slate styling:
- The first stage is to create a crate for slate. Since we will pre-lay the runneroid, it should be done solid flooring.
- Next, go to the installation of rubberoid. Disposher material, be sure to leave the allowance of 10-15 centimeters. Place the first sheet and attach it using a special buttons, otherwise it blows it to the wind. The following bands need to be placed, withstanding the nest of 8-10 cm. Watch that unwanted waves do not arise. After mounting the edge of the runneroid, which protrude beyond the crates, are neatly trimmed. In addition, it must be borne in mind that the target for the location of the slate will be the first strip made of rubberoid.
- Slate is customized in a half sheet, focusing on the height of the row. To speed up the workflow, apply to half the sheets. Sheets are fixed by slate nails that have an anti-corrosion coating, and are additionally strengthened with screws. Educated gaps are eliminated by using bitumen mastic.
- For the manufacture of the skate, boards or galvanized iron are used. You can also purchase a ready-made product in a specialized store.
The last stage of construction work is to create a ceiling, which can be performed with a flooring along the upper strapping of the walls or to flicker with finishing materials, pre-laying steam and thermal insulation.


