Thanks to the continuous improvement of building and finishing technologies, today the ceramic tiles can be bred absolutely any surface, ranging from concrete and ending with wood. Plywood - the widespread finishing material, widely used for the sheath of walls, floors and ceilings. There is nothing complicated in the stacking tiles on the Fana.
1
In order to warm the surface with plywood sheets with high quality tile, it is necessary to use the phaneer with a thickness of at least 22-25 millimeters. If you neglect by this rule, then Plywood is simply will progress under the weight of the tile. Also, to prevent deflection, plywood sheets must be securely secured in several places. For fasteners it is better to use a self-tapping screw or nails with a wide hat. If pollution is present on the plywood - be sure to remove them, all irregularities and cracks close up with a putty. To get the best result, use special wood putty, such as "Tex Re-Fine" or Eurotex.
2
Before laying a tile, a wooden surface is treated with soil. It can be both universal primer and a special composition designed to apply on wooden surfaces. Most popular with our country are ILMAX, ALPINA or SPECCO materials. At its discretion, you can choose a soil of any other manufacturer. This protective coating in two layers. Apply the second layer after completely drying the first, that is, after 6-8 hours. Solve apply with roller, brushes or sprayers. If the work is made in the bathroom - additionally process the walls with waterproofing material. To do this, the waterproofing spacing of Dichtspachtel or RapidHäster solution is perfect.
3
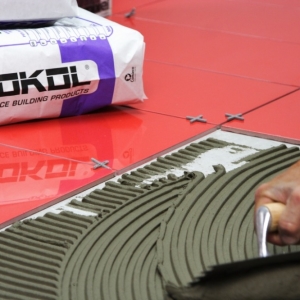
Carnate tile to plywood can be in several ways. The first method provides for the application of glue on the tile itself, the second implies the treatment with a glue solution of the wall area immediately for laying several tiles. Whatever you choose from - to apply a uniform layer, use a special toothed spatula. Also, remember that it is strictly forbidden to use glue through concrete. Such mixtures are devoid of flexibility, due to which their use is unacceptable on non-rigid surfaces, such as plasterboard or plywood. Use special glue "Typhoon Master" or "COP".
4
Installation of tiles start from the central angle. Tile with applied adhesive tight press to the surface and hold in this position 5-6 seconds. After that, align it with the help of the ranks to get smooth. While the solution does not grab, you have the ability to adjust the position of the tile, after the glue dries down - it will be impossible. Move from the first tile to the side, shove the whole range. Adjust the distance between tiles with special plastic crosses - this will help avoid the curvature of the rows and will provide equal stitches between the tiles. The average width of the seam is about 2.5 millimeters, but if you are placing the tile in a room exposed to the sharp drops of the internal temperature, the width of the seam should be increased to 4-5 millimeters.
5
After the entire tile is laid and finally grabbed with the surface of the walls or floor (usually it takes 2-3 days), we close the seams between the tiles with the help of a fugth, before applying which it should be cleaned. Solve apply with a rubber spatula, evenly distributing it all over the seam. After completing this work, wait 20-25 minutes and to remove the remains of the Fugue wipe the treated surface with a wet rag. After a few hours, wipe all the tiles with a dry cloth.
These are all the basic guidelines for laying tiles on Faneru. Holding to them, you can quickly and qualitatively shut up with a tile of any wooden surface, bringing a special highlight and comfort to the room.