Creating a ceiling in the bathroom is a difficult task due to the specifics of the room, namely a high level of moisture and essential temperature fluctuations. In addition, the ceiling surface is even subjected to direct contact with water. Not every material will endure such conditions. Let's find out what materials are suitable for the bathroom and what better to choose the ceiling.
Requirements for material
First you should figure out what the requirements should be the ceiling in the bathroom:
- The first requirement lies in the ability of the material to resist the harmful effects of condensate and moisture. And sometimes you need to be prepared and to the possible dropping of drops on the surface during the adoption of the soul, and to the fluttering water during flooding neighbors from above.
- Also, remember that the ceiling is hard to care, especially in the bathroom, as the furniture and technique interferes. Therefore, an important criterion is simplicity of cleaning.
- It is also very important that the material be aesthetically attractive and complementing the overall picture of the bathroom.
- Choose a durable and bactericidal material with special additives that can resist the formation of fungus and mold, and also do not make interest for harmful insects.

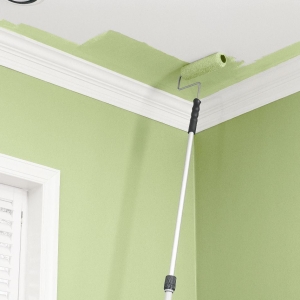
Coloring ceiling
When choosing a composition for the color of the ceiling, it is worth considering that it is impossible to use oil or enamel, the surface will soon yellow, the cracks will go, which will lead to a shower of the finish. The choice should be given in favor of the coloring agent, which is resistant to humidity and temperature drops - water dispersive or latex paint. However, remember that it will not protect such a ceiling from flooding.
The option is quite popular, so consider the process of painting the ceiling in the bathroom more details:
- First, the surface is cleared from the remains of an old coating, dirt. In the presence of fungi, you need to treat the ceiling by anti-flap composition or ordinary 9% vinegar.
- Then all present defects smeared putty.
- To smooth the surface, apply water-resistant putty.
- When the filler is dry, sand the plane and remove irregularities.
- In the next step prime the ceiling choosing primer dependent on the type of dye, preferably one producer.
- To give the paint the desired shade of color used.
- Paint ceiling surface with a brush, roller or spray.
- After 2-3 hours should apply a second coat of paint in a direction perpendicular to the preceding.
- Such a ceiling is subject to washing without any consequences.

The ceiling of the plastic panels
Plastic is great for plating bath, meets all the requirements, easy to clean, it allows you to mount any lighting system. Such material is fixed in accordance with such instructions:
- Determine the level at which the ceiling will fall.
- In the next step the frame is made of timber, pretreated moisture barrier composition or galvanized profile. The guides must be parallel to each other and to be perpendicular to the future of PVC panels. Maintain a step in the 50-60 cm.
- Then be engaged in the installation of electrical wiring for lights. Remember that all the wires must be enclosed in a corrugated pipe.
- Panels attached to the frame, starting from the wall, fixed by snapping tongue and groove.
- Holes for fixtures should be done during the surface of the skin.
- To compensate for the visual height of the ceilings with little loss are used glossy PVC panel.

The ceiling of the siding
Siding is a popular material for wall surfaces indoors and outdoors, including it is suitable for use in the bathroom, transfers and humidity, and the temperature increase, and are not interesting for mold and insects:
- Determine the distance from the ceiling to the rough surface of the suspension, given the size of lighting fixtures, which will be installed later.
- Next we fix the frame of the timber around the perimeter of the tub, which is attached to the surface by means of screws, maintaining pitch 50 cm.
- After that you must install on the frame of the starting profile, fixing small screws.
- We perform installation of wires and cut holes in the siding for them using stationery knife.
- Now we proceed to the installation of the siding - insert the panel into the starting profile, and more precisely in its grooves.
- After installing the lamps can only remove debris.

Wooden ceiling
A fully allowed option in the bathroom is to use wooden lining, which reacts perfectly to high humidity. Especially such a finish ideally looks in a country house or in the country. In this room, the smell of wood will be appropriate and even in some kind of romantic, and its attractive appearance will embark on the finish. The lining on the pre-installed frame made from bars, with nails, is attached.

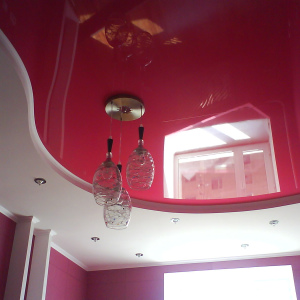
Stretch ceiling
A tension ceiling is considered a popular and fashionable solution for the bathroom - it be a matte or glossy. In addition, it is a fairly practical option, since the cloth does not respond to humidity, temperature drops and in the event of a leakage withstands up to 100 liters of water. All these advantages justify the high price of the canvase.

Ceiling of plasterboard
Special plasterboard should be used for the bathroom, because the usual material has the property to absorb moisture and deform. But moisture-resistant perfectly aligns the surface, hides the wiring and opposes moisture. The frame is mounted from aluminum, the sheets are attached to it, starting from the center of the room. After installation, the surface is carried out, the surface treatment of corners and primer is performed. As an finishing finish, the water paint is most often chosen.

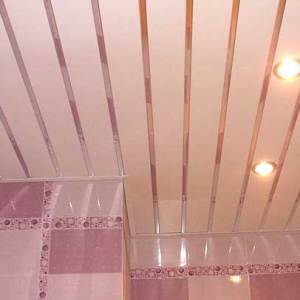
Aluminum ceiling
Another popular option suitable for the bath is a rack aluminum ceiling. Aluminum walked with light and moisture-resistant material that is not terrible corrosion. And thanks to its mirror surface, the space is visually expanding. The most complex when mounting the aluminum ceiling lies in the creation of the frame, because when lining the rail, you just need to snap on special guides.

Tile ceiling
Such a surface is distinguished by a lot of advantages: does not require the perfect leveling of the base, absorbs moisture, not sweeping at the same time, allows you to replace any of the plates if it is damaged. A certain disadvantage is a small range of polystyrene foam plates on sale. And it should also be borne in mind that the finish needs constant washing, as many condensate accumulates on it. Also, be prepared for what looks like the ceiling will be too easy.

Poles the ceiling
Old, however, together with this proven way, which over the years have used our parents, is the whitening the ceiling surface in the lime bath. Calculate that sometimes you have to rinse the old coating and apply new, since the whirlwinds poorly responding to humidity. And of course, nor what aestheticism and originality in this case do not have to talk, except, subject to an accent on the walls in the bathroom. But as a temporary option or with a limited budget is quite acceptable. But the chalk packers will not suit, because, besides all the above disadvantages, the chalk layer is of interest to mold.

Vinyl wallpapers
An option with ordinary wallpaper when pasting the ceiling in the bathroom is unacceptable, but the vinyl will fit for this purpose, as they do not fear the wet environment. In addition, there is the possibility of painting them when carrying out repair work in this room. However, get ready for surprises - even such wallpapers can appear under the influence of temperature drops.

Thus, despite the high humidity and sharp changes in the temperature regime characteristic of the bathroom, there are many ways to finish the ceiling surface - both popular, and budgetary, and expensive, and temporary.