Every square centimeter and free angle appreciates in the urban apartment. Therefore, the desire to turn a cold balcony to the game zone or the office and increase in this way the living area is quite explained. The embodiment of the task of arranging an emanitated room begins with floor insulation on the balcony.
Features of choosing insulation
Criteria for selecting thermal insulation material:
- The balcony is actually located on the street and is experiencing environmental factors, and before choosing a heat-insulating material, its condition should be taken into account, namely the integrity, the presence of cracks, etc. The load that turns out to be overlap must be no more than 200 kilograms per square meter.
- In this room, the heating system is not provided, the concrete floor attracts cold, and dampness is felt on the balcony. Therefore, it is necessary to take into account the level of humidity here, and also to observe whether the condensate appears on the floor.
- When selecting the insulation, determine in advance whether you will lift the floor, as well as the type of floor covering, which is planning to lay in the future.

For use on the balcony, such insulation will be suitable:
- Penophol. For the manufacture of material, aluminum foil and foamed polyethylene are used. It increases the thermal insulation of the balcony and is an excellent waterproofing material. The thickness of the material produced in rolls is 3, 5 and 10 mm. After insulation, the useful space is practically not lost. As a rule, it is used in conjunction with the penplex, and aluminum tape is used for gluing pieces.
- Styrofoam. The insulation is very popular due to its low price and is well suited for the balcony. Sheets have a thickness that ranges from 2 to 10 cm. The technology of thermal insulation of the floor is to place the foam pieces between the lags and the fudgement of the discovered slots.
- Penoplex. Its properties are beneficial to stand out against the background of other insulation: this is low vapor permeability, and low weight, and chemical inertness. But its price is high. Sheets may have a thickness of 2, 3 and 5 cm.
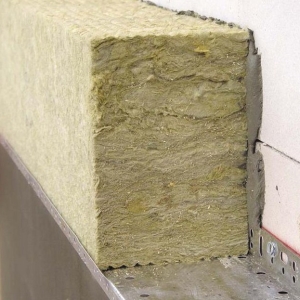
- Mineral wool. The porous material is made from basalt or fiberglass. Minvata does not react to moisture, and also capable of penetrating any slot, therefore it can be achieved with high-quality heat insulation. However, when it is installed, one inconvenience is observed: it ourselves. You can buy material in rolls and sheet.

Floor insulation instructions on the balcony
Consider more detailed how the floor insulation is happening on the balcony:
- Before proceeding with the insulation of the floor, carefully examine the surface for the presence of defects. Cracks need to be seeded with plaster or special mixture. Any irregularities of sex should be eliminated, as water is capable of accumulating. If you do not want to make a light tie, you can simply align the base by self-leveling mixtures.
- The surface is necessarily cleansed from garbage, dirt and dust.
- Go to the installation of waterproofing material. Polyethylene film is perfect for this. It must be attached to the walls, making it all. The jokes are sampled by scotch.
- Given the conditions on the balcony, you will need to lay several layers of thermal insulation material. Place the plates directly on the waterproofing in the chess. To eliminate the appearance of cold bridges, place them tight. When using a foil material, it is treated with a brilliant coating down.
- At the next stage, put lagows by covering their surface to protect the antiseptic composition. The height of the lag is leveling the width of the heat insulating material. The level of lag should be set, focusing on the highest floor point. The step is 50-60 cm, back from the walls as much. Self-tapping screws are used for fastening lags.
- Next, lay the second layer of thermal insulation by placing the material between the lags. Do not leave between the plates of the gaps. It is better to use clocky material that has a foil layer. Otherwise, you will need to put another layer of waterproofing to prevent the destructive effect of condensate.
- Finally, finishing floor finish is carried out - a cement-sand screed is poured or a wooden coating is stacked.

Warm floor on the balcony
A good solution for the balcony is the installation of a "warm floor" system, which is carried out in accordance with such instructions:
- Lay on the concrete base of the insulation plate, the thickness of which is 20-40 mm, and fix the special glue.
- Before laying the heating sections, cover the surface with a thin layer of glue, which you used when mounting the plates. Also possible installation of a welded metal grid.
- Apply competently to the selection of the system: its power for the balcony should be 150 W per square meter at a laying step 12 cm. But if you want to achieve a temperature above +20 degrees, this indicator should be increased to 180 at a step 10 cm. With high heat lines on Balcony Reduce floor laying step up to 7 centimeters.
- Between the rows is also recommended to withstand a certain distance that is 0.5 m.
- When installing a warm floor, an assembly tape is used, providing a permanent pitch of the cable. To the isolation of the tape is fixed with self-draws.
- Next is the thermal sensor enclosed in corrugation.
- Move the end of the heating section to the thermostator and the wire moving from the thermal sensor.
- After installing the heating sections, the screed should be pledged, the thickness of which is about 5 centimeters. If the warm floor is thin, you can not do the screed, as it is placed in the tile glue.
- The system can be connected after the screed finally hardens.
Note. All materials, be it tiled and linoleum as an finishing coating, should be designed to use together with the "Warm floor" system.

Thus, you can insulate the floor on the balcony using a thermal insulating material that is suitable for operation in such conditions and by mounting the heat-in-floor system.