Ceiling lights with LED ribbon, halogen lamps and luminescence - one of the most winning techniques in interior design. And although these techniques are used abroad not so often, we only increase the popularity of such design. This technique is desirable to use in some styles of interiors - High-tech, techno, expressionism, futurism, fusion and others. The question is how to make a ceiling with backlight yourself, relevant, and there is nothing difficult in it.
The highlighting varieties: point diodes, halogen lamps, LED ribbon, neon lamps and duralite with incandescent bulbs. Ribbon illumination gives the most even dispersion, it is produced in all shades of the rainbow spectrum.

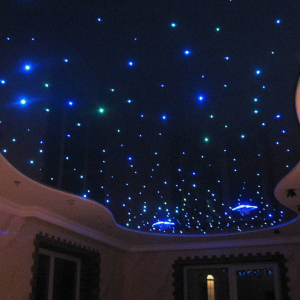
- Duplex plasterboard ceilings may have a combined backlight - the starry sky effect in the center and halogens at the lower level along the edges.
- Stretch ceilings will also decorated under the starry sky, while in different ways.
- The easiest way to restrict ourselves to the LED ribbon around the perimeter. The glossy and matte fabric of the stretch ceiling will give absolutely different effect.
- The backlight form an additional amount of space - in niche and deepening. In the center of the ceiling, you can create a feeling of sphericity.
- Interesting decorative effect - smooth backlight from under ceiling eaves. Soft cold neon flows down the fabric falling to the floor, scattering along the way.
- In the interior with a scanty color decision, the ceiling light illumination will create a new mood and will add paints.


At a large perimeter, up to 10 m are used parallel to 2 rolls. For the simplest installation, it is enough to fasten the tape on the polystyrene cornice, mount it on the wall at the ceiling and connect the design to check. The controller and the power supply must be hidden near the outlet, for example, in the closet, on the rack or the curtain. You can use the imitation of the brain under these goals.