Many of our compatriots prefer to delight their households with natural vitamins, grown at home. Therefore, with the onset of spring, they begin to actively prepare for the landing of seedlings in their “estates”: they build a convenient greenhouse, prepare high -quality substrate For cultures, think over the watering system and lighting of seedlings. How to organize the backlight of seedlings with your own hands?
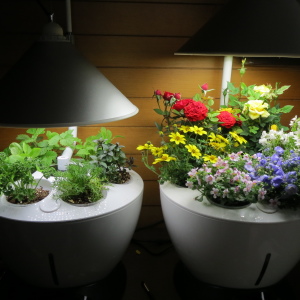
Regardless of where you grow seedlings - on the windowsill or in the greenhouse, it needs additional lighting. After all, daylight hours in early spring are still too short to ensure maximum growth of plants. Reduces lighting and cloudy weather. Driving seedlings of seedlings will help to solve the problem of low illumination.
Let's find out what spectrum is required by seedlings:
- The red spectrum triggers in the plant the mechanism of photosynthesis at the moment when it is cursed through the soil layer, and stimulates the process of flowering of crops.
- Blue and purple light affects cell growth and the formation of strong sprouts: cells begin to share more strongly, but do not stretch.
- Yellow and green are necessary for the growth of healthy seedlings, despite the fact that they are reflected from the sheet.

- Mercury lamps. They demonstrate good indicators close to daylight, but the white spectrum is not so important for plants.
- Sodium metallic lamps. Such sources are characterized by high efficiency and efficiency, but they lack a blue spectrum.
- “Ilyich bulbs” are not intended for illumination of seedlings due to its inefficiency: 95% of energy turns into thermal radiation and only 5% - into light, as a result, the seedlings are stretched, and burns appear on it.
- Luminescent lamps are low -power, they must be used a few pieces, in addition, they provide cold light with a low red spectrum.


- We will place the LEDs in 2 rulers to create uniform lighting of the entire area. Since each LED has its own light cone, the angle of which is 70-120 degrees, when placing the projection of cones, they must be blocked.
- For the design, such LEDs will be needed: red-30 pcs., White and clean-white-10 pieces, blue-20 pcs. Also prepare the drivers that are required for them.
- When developing a scheme, consider the possibility of connecting them in different combinations, say, the inclusion of twenty blue and twenty white LEDs.
- As a body for a lamp, we use an industrial type lamp, designed for two lamps, having previously removed the filling from it.
- LEDs attach to aluminum plastic, using thermic mesh.
- At the final stage, we fasten the fans from the power supply.

- Prepare: 24V power supply, designed for 2A; The power supply, which is necessary for the couller, at 12V; Directly the coaller itself, suitable from the computer; aluminum for heat removal; Blue LED matrix 10W; red matrices - 2 pcs.; epoxy adhesive; thermic mesh; the wire.
- At the next stage, it is necessary to clean the wires, coating later by their angle, having previously melted it.
- Diode matrices should be soldered to the ends of the wire to connect the plus and minus of neighboring diodes.
- To the ends that remained, solder the wires to join the power supply.
- When choosing diodes, make sure that the amount of their voltage is equal to the possibility of a block, in our case - 24V.
- In the aluminum strip, make two “ear”, where you will attach the coaller using thermocles.
- The diodes chain are glued with epoxy glue.
- At the final stage, the edges of the aluminum strip should be bent - it should become a reflector, and also include the device in the outlet.

And finally, several practical tips. If the stems stretch, and the leaves will grow wide, they will acquire a bright green color, then the light for seedlings comes in sufficient quantities. Check if the plant illumination fries: if you substitute your hand in front of them, you should not feel warmth. It is necessary to turn off the backlight if the leaves of seedlings began to close and take a vertical position, for each variety it will be different time - one plant needs 13 hours of light, the other - all 17.