


The parallelepiped is a volumetric geometric figure, at the base of which a polygon lies, and the faces are parallelograms. Many schoolchildren are difficult to comprehend this concept and even more so solve the challenges for the calculation of the area and the volume of the parallelepiped. In order to help the child in mastering knowledge of geometry, make a layout of the shape with it from paper.
How to make parallelpiped from white paper
The volume model is collected from the stencil, which is just done by himself. Prepare: A4 paper sheet, pencil, ruler, scissors, glue.
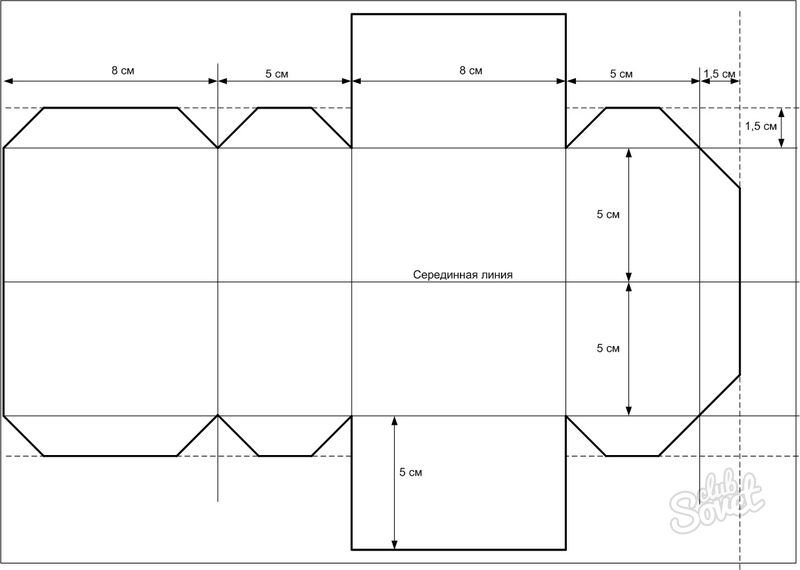
- Put the sheet in front of yourself with a wide face (along). Separate from 2 sides of its side part equal to 21 cm, in half and spend the line.
- Suppose that the height of the parallelepiped edge is 10 cm. Memble from the middle from two edges up and down 5 cm and connect the marks to the sections.
- For the formation of the sides of the figure, set aside on the first and last lines alternately - 8, 5, 8, 5 cm. Connect the lines to the points between themselves - the fins of the parallelepiped.
- On the second and third vertical direct, mark 5 cm from their beginning and end (up and down), since we have a width of one side of 5 cm and connect the ends of the segments by receiving a quadrangle.
- Back from the contour of the figure of 1.5 cm on each side and swipe the mark that denotes the place for fastening.
Important: Do not go for the protruding side rectangles, so that they subsequently accidentally cut them.
- Cut the resulting figure, cut the bonding strips with corners.
- Bend the workpiece along the edges, coming them with your hands. Purchase the basis for the other side so that the pencil grid remains inside and sell the mark over the entire surface.
- Squeeze the battery glue on one side. Roll into the figure and starting from the extreme stripes, stick to it the opposite face, then the top base. Repeat the procedure on the other side and the parallelepiped is ready.

How to make a rectangular parallelepiped paper - cube
Cube is also a parallelepiped, only rectangular, whose faces are squares. It is drawn up by the same scheme as in the first version.
- Build sequentially four square of the horizontal direction and two on the sides of the second vertical axis. Turn the valves on the gluing.

- Cut off the scan, Przellitate the face, spread the linen of the allowance and glue the cube.

How to make parallelepiped paper in the origami technique
This method is good because for the manufacture of the figure you need only a square sheet of paper.
- Bend the leaf of pressure from both sides, the resulting corners will divide the billet from the folded triangles.

- Turn over 90º figure. Bend to the left and right corners to contact, selling bends with your fingers. Put the sheet to the back side, repeat the action.

- Remove the bent angles and fold the other, formed from the free tips of the sheet and targeted by the vertices to bends.

- Insert the corners in the resulting pockets.

- In the hole formed at the bottom of the model, insert a pencil or dunge, and the figure will find the volume.

Paper parallelepiped can be used not only as a visual geometry allowance. If the figures are made of color cardboard, they will be useful in children's games, and made of decorative paper - help beautifully pack a gift or souvenir.


