


Printing on the keyboard should be able to be able to every person who has a stationary computer, a laptop or a netbook. Self-taught often do not fully master the method of a blind set, and therefore they can not turn on all fingers that are needed for quick, efficient operation on the keyboard. It is believed if a person dials less than 150 characters per 1 minute, he does not own a computer as a tool. And, indeed, in order to increase your capabilities when working with this technique, it is important to be able to quickly print, that is, to keep up for your thought!
How to learn to print blindly - the main provisions
The ten-chand method of the blind set includes the operation of all ten fingers on the hands. In perfect, the typing blindly looks like relaxed, naturally. Printing is easy and fast. The whole essence of learning to a ten-chassic set is well-studied rules that are repeated to automatism. Man performs various number of actions every day on autopilot. With the study of these rules on one action will become more. It is advised to pay off the fear and retain a rush.
- Important rule 1: During printing, do not lower the eye on the keyboard, do not check written.
- Important rule 2: For each finger there are rules.

How to learn to print blindly - do not be afraid to make a mistake
In order to facilitate life, you can print the crib, preferably in color. All fingers should be depicted on it, as well as their backups. This cheat sheet is attached at a convenient location, removes only when all fingers are studied. And do not forget: you can watch in the cheat sheet, but you can not on the keyboard! Forbid yourself to be afraid of mistakes. The computer will easily fix them.

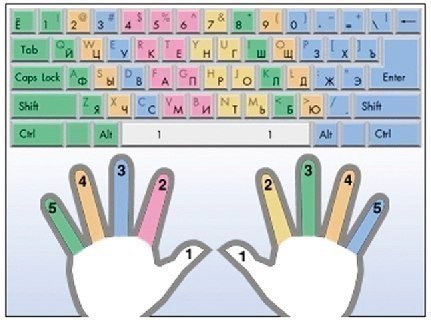
How to learn to print blindly - Keyproof and finger destinations
- The keyboard is divided into 4 rows. The zero row is where the space is located, respectively, 4 row with numbers. The support row "Fuck-Algeh" is a series on which you always lie all your fingers, starting it from it. "Fuck" - for the left hand. "Algeh" - for the right.
- On the keys "AO", you can find special convexities, they are needed to quickly navigate, correctly arrange the fingers of the left and right hand. These keys are located in the support row.
- Backspace is pressed by a little finger or a ring finger right hand.
- Enter picks up the mother's right hand.
- Space - for big fingers of both hands.
- SHIFT - Two of the keyboard of such keys. If you need to use the left register symbol, SHIFT is like a maiden from the opposite side, on the right. Conversely, the symbol from the right register means that shift is pressed by a little finger on the left side.
- Index finger of the left hand - "56, ke, ap, mi"; Right - "78, ng, ro,".
- Key "Pr" and "Keng", "Mit" are intended for index fingers.
- The middle finger of the left hand "4OZS", the right "9 host".
- Unnamed finger of the left hand "3TSCH", right "0 share".
- Mysiline Left Hand "E -12, Tab, Y, Caps Lock, F, SHIFT, I". Mysilineal of the right hand "- \u003d \\ backspace; Zheentter; Jeenter; Apostrofshift ".
- With numbers that are located on an additional keyboard on the right side, work with your fingers right. You can find the convexity on the "5" key, which is located in the center of the support row. There are four rows from top to bottom on the extra keyboard. Four fingers work. Each finger is assigned your row. For example, the index finger clicks the "NUM LOCK, 741, ENTER" keys.
- In the case of a high-speed dialing, the brush does not lie on the table or keyboard, and soars in the air.
- Do not hurry! Only diligent practice gives good fruits.
- Today, start typing any favorite text.
How to learn to print blindly - landing at the table
To increase the fruitfulness, a man working at the table should know how to sit correctly, in order not to worship. The fact is that sitting work with time leads to pains in the back and scoliosis. There must always be intervals for recreation. Safe landing rules are very simple.
- Feet are located on the floor or stand, cost smoothly.
- The back straightened, the back of the chair concerns the spine.
- The monitor is located directly in the face, at a distance of at least a meter.
- The neck is not bent, the head looks straight.


