Shower corners are an ideal solution for the arrangement of small-sized bathrooms. From traditional cabin boxes They differ in the absence of rear walls and ceiling panels.
1
The main advantages of shower corners are compactness, affordable price and simplicity of installation. Following our instructions, any, not even sanitary skills, a man, will cope with the assembly and installation of the acquired design. We consider the technology of installing a shower corner on the example of one of the most popular models - with a shower pallet and a double-handed sliding system.
2
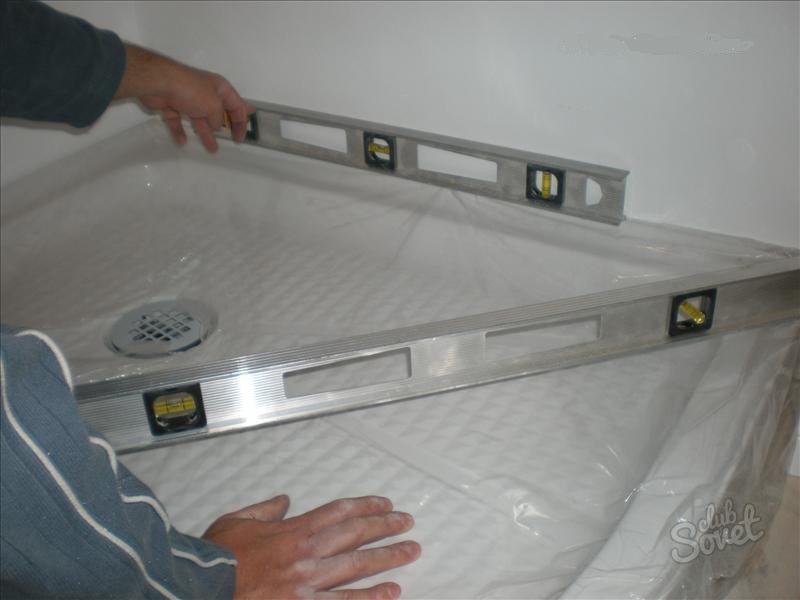
Before starting the installation of a shower corner, you need to make sure that the geometry of the walls and the floor of the bathroom with the help of a building level. In the presence of significant errors, the floor must be aligned with a concrete screed. The explicit curvature of the walls can be eliminated by placing with moisture-resistant plasterboard (water pipes located along the wall, better remove the drywall panel to the future they do not interfere with the installation of the shower design). After leveling the walls are necessarily processed by a special waterproofing primer. A tile is recommended as a facing material.
3
Prepare a space for placing a corner, proceed to the assembly of the shower pallet according to the supplied manufacturer's instructions. Install the collected shower bottom on the selected place in advance, place it in terms of level, adjusting the screw legs. After that, on the line of the edge of the pallet, make the marker four marks on the wall under the mounting: two - closer to the corner and two more - closer to the edges of the pallet. Aside aside aside, in the marked places, drill holes. Then, with fasteners, fasten the shower bottom to the walls. Factory locks-fitimias are better to replace with powerful hooks, which are commonly used when installing water tanks - they are much stronger and more reliable than "native" mounts.
4
The next step is to connect the pallet to the sewage. For this, the flexible sleeve of the siphon is connected to the fan tube (be sure to use the sealing gasket and high-quality moisture-resistant silicone sealant). Next, it is necessary to check the drain system and connections to the pipes for tightness - for this, fill the pallet with water under a sufficiently strong pressure. Making sure the absence of leaks, finally secure the design in the desired position. The junction between the walls and sides of the pallet will plenty of silicone. An important nuance: acrylic pallets, distinguished by flexibility and fragility, need additional strengthening from below (bricks, penplex or mounting foam).
5
It is possible to start the installation of shower walls after complete drying of the silicone sealant (as a rule, it is 7-8 hours). In advance for convenience, sort the guides for doors and frame racks. First of all, secure the bottom guide on the edge of the pallet (plant it on the moisture-proof sealant and attach to the walls of self-draws). Next, alternately, on each side of the installed lower arc, attach vertical racks to the wall. Place them as soon as possible with the level of level, make the markup on the fastening on the tile.
6
After that, in the marked places drill, drill holes (the optimal depth is about 8 mm), insert plastic dowels in them. Then the side of the racks that will be shrinking with the wall, abundantly smearing the sealant. Next, install the rack vertically on the markup and pull the screws to the wall. Insert the walls in the set frame and secure them with fasteners. After mounting both walls, install the upper guide, it is attached by the same principle as the bottom - on the sealant and self-tapping screws.
7
The final stage of installation is the mood of the sliding door of the shower corner. Insert the grooves in the grooves. Next, attach the door to them - first to the upper arc, then to the bottom. After installation, adjust the doors in such a way that in the closed position they had the most dense pairing - without gaps and lumen. It remains to attach accessories, it is desirable to put a transparent silicone gasket for each part of the handle.
8
At the end of the assembly work, check the design on tightness - direct the water stream to the place of the joints, in the case of leakage detection, re-process the problem seams with silicone (remember that the sealant is applied solely on a dry clean surface). It is possible to fully exploit the shower corner 10-12 hours after installation.
So you can independently install a shower corner in the bathroom.