Installing or updating BIOS is necessary if the outdated version of the BIOS does not support new devices, the device conflict arises or the virus damaged the built-in system data. It is also useful when overclocking the computer. To install the BIOS from the flash drive, you need to successively perform several steps.
1
Definition of model motherboard. As the BIOS is installed in the ROM on the motherboard, then, in fact, we will update it. And for this you should know exactly the name of its model. You can simply look into the book on the motherboard, which is included with the computer, or in the system unit, where the name is indicated on the board. You can use Windows software: Click Combination Win + R., Enter the command mSInfo32. and click OK. A system with information about the system, including the version of the installed BIOS, will appear.
2
You can not always find out the name of the motherboard using the MSINFO32 command. In this case, the program will come to the aid Aida64 Extreme.. 30 days you can use it for free, and download the program here. Install and run the program. In the list on the left, select "Total Information". On the right there will be general information about your system. In the "System Board" section you will see the name of your motherboard.
3
Downloading firmware. Enter the name of the system board model in any search engine. Follow the link to the manufacturer's site. In the downloads section, select BIOS. Find the latest version with the Instant Flash mark and download it from the server. Unpack the archive to clean, and even better on the formatted flash drive. Insert the USB flash drive and restart the system.
4
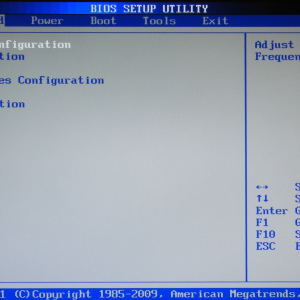
Installation of firmware. During the boot, press Del or F2 to get into the BIOS settings. If your motherboard supports Smart technology, go to this section and arrows to select Instant Flash. Otherwise, find the section, in the title of which appears the word Flash.. The system will automatically determine your USB flash drive and available BIOS versions.
5
Select a flash drive to which the BIOS file is recorded, and the version of the installed firmware. Press ENTER. A BIOS update will be updated, after which the computer will reboot.
6
In some cases, to install the BIOS, you should boot from the flash drive to which the installation file is recorded. To do this, when boot, press DEL or F2 to enter the BIOS menu. Look for the BOOT tab and in it Boot Device Priority.. The device load priority is set here. Usually, a hard disk is displayed on the first line with Windows installed on it. Having highlight this line, press ENTER to change the load priority. Select your USB flash drive from the list and press ENTER. Press F10 to exit BIOS while saving settings. After rebooting, the mounting file of the flashing will start.
Important: During the BIOS flashing, do not turn off the power - this will lead to serious consequences. If you have an uninterrupted power supply - connect to it. On the site manufacturer's website, carefully read the firmware instructions, as a rule, they are attached to the BIOS files.
It is not recommended to make the BIOS flashing if the computer works fine. There is always a risk of failure or incorrect actions that can lead to the collapse of the system. Update the BIOS only if the system works incorrectly, and the downloaded firmware really eliminates the existing faults. Download only the full BIOS versions, alpha and beta versions still need to be revisted and may contain errors.
Share advice:"How to install a BIOS from a flash drive"