


Install Windows on a flash carrier with different goals. For example, writing an image for installation will lead to the creation of an installation "keychain", and the copying of the Live assembly will allow you to load a full-fledged working environment from the flash drive, intended for tests and repair and restoration work. This article will consider both methods.
Installing Live Assembly Windows WP on USB
If you have an extra media, be sure to take care of creating a Live USB device in advance. If any problem occurs, you can download Windows from it, even if the system does not load from the hard disk. For subsequent work, we will need:
- a flash drive, a volume of at least 1 GB. (Live builds of Windows XP "weigh" from 600 MB., But the size can fluctuate in any direction);
- special image of Windows XP, such as RAM WINXP Live CD / USB Edition, RusLiveFull_CD \\ DVD or any other you consider the best;
- the program for recording - WinsetupFromusB, on the official site exists in versions x64 or x32 (choose under your PC).
The process itself will take several minutes and does not require any complex manipulations from the user:
- We connect a USB flash drive to the system unit (preferably USB 2.0), saving any data from it in advance that you may be needed (they will be erased during the recording).
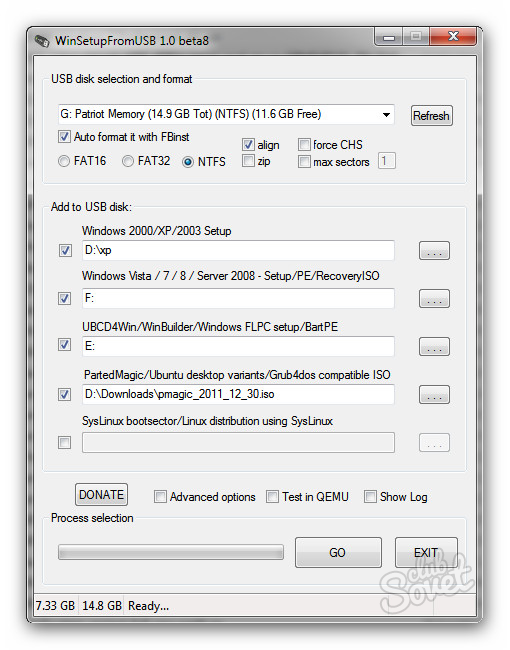
- Run the WinsetUpFromusB program.
- In the first field from above ("USB Disk Selection ..."), choose our carrier.
- Under it, we leave daws in the "Auto Format" boxes, select the type of file system - for example NTFS, mark the "Align" and "Copy BPB" items.
- We also put a gallery near the "Other Grub4dos Compatible ISO" line, select the path in which the image of the system is.
- Click on the "Go" button and wait for the end of the recording, without closing the program and without removing the flash drive.
- When the "Job Done" window appears on the screen - the device is ready to load Win XP.
- After rebooting the computer, click on the disc select key for loading (F8, F11 or F12).
- In "Boot Menu" choose our flash memory.
- Depending on the elected assembly, Windows XP with a graphic shell can not boot immediately. On the example of RusLiveFull_DVD: in the bootloader window, select RusLiveFull_DVD from Partition, in the following - Multimedia.
- When the system is loaded, it is fully ready for use.
If our goal is not testing, but setting up a new Windows, much depends on the specific assembly, which we chose in the first paragraph. At the moment there are versions of images that allow and download the Live system from the media and install Windows from scratch. The principle of creating an installation "keychain" is similar to the above instruction. It will differ only to an image for installation and a string in which it must be specified - the first in the "Add to USB" menu, indicated by "Windows 2000 \\ XP \\ 2003 Setup". If there is enough space on the device, WinSetupFromusB will allow you to write several ISO images - just tick the necessary points at the same time.


Do not knock people off - do not confuse the concept of installation on the USB flash drive and installation from the flash drive!