


When using the microphone, users often face the problem of noise in it. Pick, hum, noise can be removed in several ways, as the reasons differ.
Causes of noise in the microphone
The noise in the microphone can disturb both when recording and when communicating. It does not depend on the price of the instrument, as well as the built-in it or connected. The main causes of noise in the microphone are:
- insufficient Internet connection creates interference;
- the structural feature of the device, the membrane catches the surrounding sounds, for example, the components of the computer, the sounds of household appliances;
- incorrect adjustment of the device;
- course of microphone.

Methods for elimination of noise in the microphone
First you need to check the performance of your microphone, for this you need:
- turn on the PC;
- in the lower left corner, click the "Start" button;
- in the search bar, enter "sound recording";
- open the sound recording app.
This is an application for recording sound. In the window that opens, choose:
- "Start recording";
- we speak a microphone a few words;
- click "Save Record";
- play saved recording.
If when listening you hear your voice on the record, then the microphone is worker. Spend this technique again with the devices turned off in the house. If this method did not bring the result, then try to wear a paralyak ball to the microphone to protect against foreign sounds. When writing sound Speak while being close to the microphone.
Often the problem of noise in the microphone with an online conversation is the low speed of the Internet connection. To solve this problem, it is necessary:
- stop the download files (if it is carried out);
- stop the work of programs;
- increase the speed of the Internet;
- replace provider.
It is possible that the problem of noise in the microphone is associated with configuring software. For this you need:
- in the lower right corner on the taskbar, click on the volume icon with the left mouse button;
- from the listed, select "Recording Devices";

- in the left-click window, press the microphone, select "Properties";

- in bookmarks, choose "listen";

- click "Apply", then "OK";
- we go to the "Levels" tab and adjust 2 runners;
- the "Advanced" tab, you can adjust the frequency, achieving the purity of the sound in the microphone.

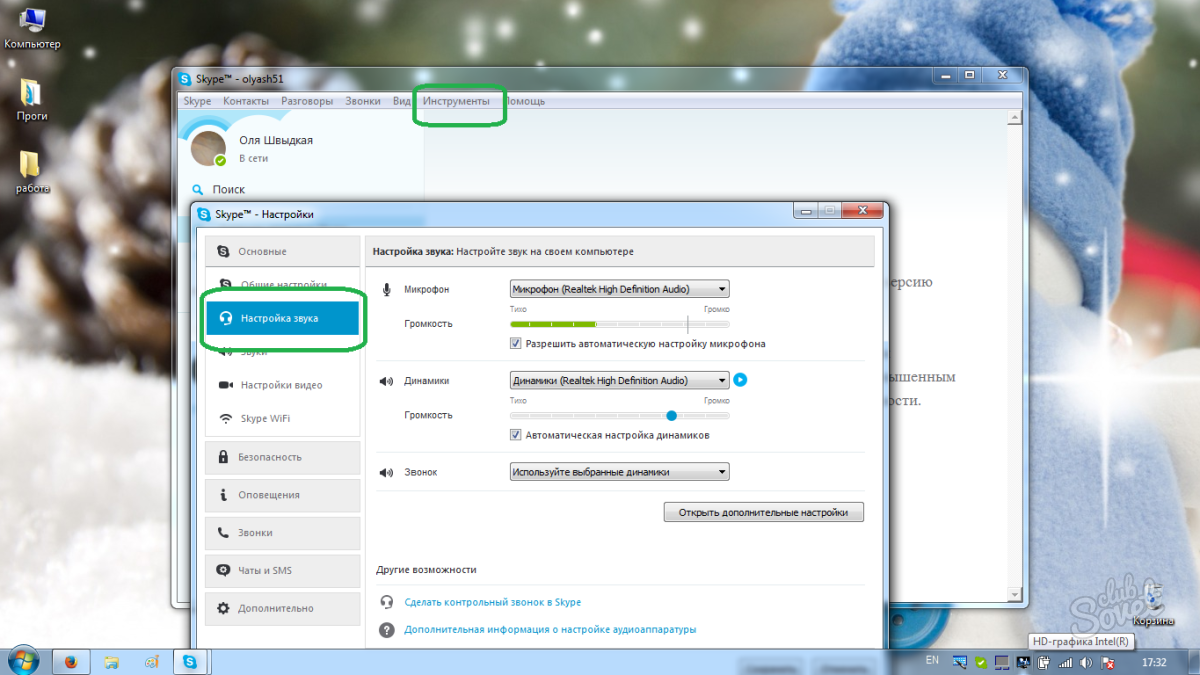
Microphone Setting in Skype
If there is noise in the microphone during a conversation in Skype you need:
- run Skype;
- in the bookmarks, select "Tools" from the context menu select "Setup";
- in the pop-up window, select "Sound Setup";
- in the pop-up list, select your microphone, speaker;
- save settings.
Microphone setting in Mail.Ru Agent
To adjust the microphone in the agent it is necessary:
- launch the application;
- in the lower right corner of the program being opened, select "Menu";
- in the pop-up menu, run "Program Settings", then "Voice and Video";
- we carry out the microphone setting.

There is enough to get rid of noise in the microphone. If you did not come up with the first way, do not despair and use the subsequent. If the microphone is not broken, then it can be configured in any case.


The mobility guide
actually
And it helped me