Making a quick screen shot - a screenshot, very useful skill, so you can share with friends and colleagues the contents of the monitor in seconds. We will analyze two ways to do it in the Windows 7 system without installing third-party software.
How to make a screen on Windows 7 Computer - Standard Method
Look at your keyboard. In the upper right corner there is necessarily there is a key called "PRTSCR", or "PRTNSCN". Find it and proceed to the instruction.

- press the PRTSCR key, its location may differ on different keyboard models,
- now the screenshot is in the exchange buffer, and you need to move it from there,
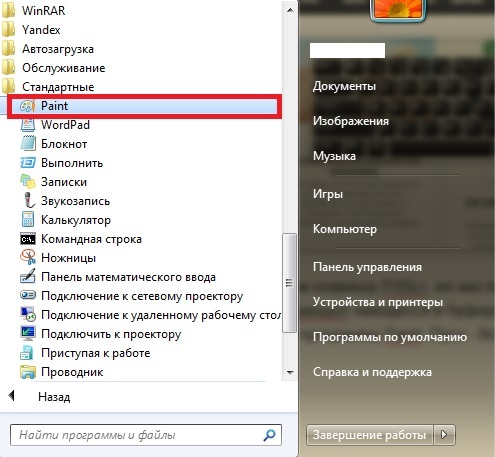
- go to the Paint program. Start - All Programs - Standard - Paint,
- as soon as the program opens, press the CTRL + V key combination simultaneously,
- the screenshot appeared in the program,
- save it by clicking on the blue menu button in the upper left corner,
- in the list that appears, select "Save As",
- next, for better quality, click "PNG Image",

- now specify the directory to save and name the file,
- the process is over.
If the PRTNSCN button is missing on your keyboard for any reason, then press it on the electronic keyboard. To do this, hold the combination of the Win + U keys, in the window that appears, select "Enable the on-screen keyboard".
Also, for some laptop models, the combination of the Fn + PRTSCR keys is characterized to create a screenshot. The Fn key is always from below, and most often the Win key.

How to do screen on Windows 7 Computer - Scissors
The way is easier, but less functional. Here you can immediately cut only some screen area.
- go to Start - All Programs - Standard - Scissors,
- in the appeared window, clamp the "Create" button, the entire screen burns a bit,
- still the cursor the area you want to cut,

- as soon as the area is highlighted, a new window will appear,
- save the screenshot by clicking on the "File" field on the left, and then "Save As",
- select the directory and file name,
Your screenshot is ready.

Try both options and select the most convenient for yourself. Do not forget that the on-screen keyboard can always help you in the absence of some keys.