


Features of the technology expansion of the balcony are presented with strict requirements for the quality of the works, for which certain skills are needed.
Choosing a variety of removal
There are two options for expanding the balcony area:
- The removal of the windowsill allows with minimal effort to increase the balcony space in general, but the floor remains unchanged.
- The expansion from the stove is made much more difficult, but as a result, the area of \u200b\u200bthe room will significantly increase.
In principle, it is possible to use both methods if the technical condition of the building and the balcony allows. However, it should be remembered to limit the maximum deposit size - no more than 50 cm.

Balcony takeaway design
To determine the volume of the planned restructuring of the balcony, measurements and calculations are made, given the structural features:
- Type of removal;
- Expansion dimensions;
- Roof and floor design;
- Number of windows;
- Warming method;
- Options for outdoor and interior decoration.
Deciding with the configuration of the balcony, draw the drawing and calculate the number of building materials.
Preparatory work
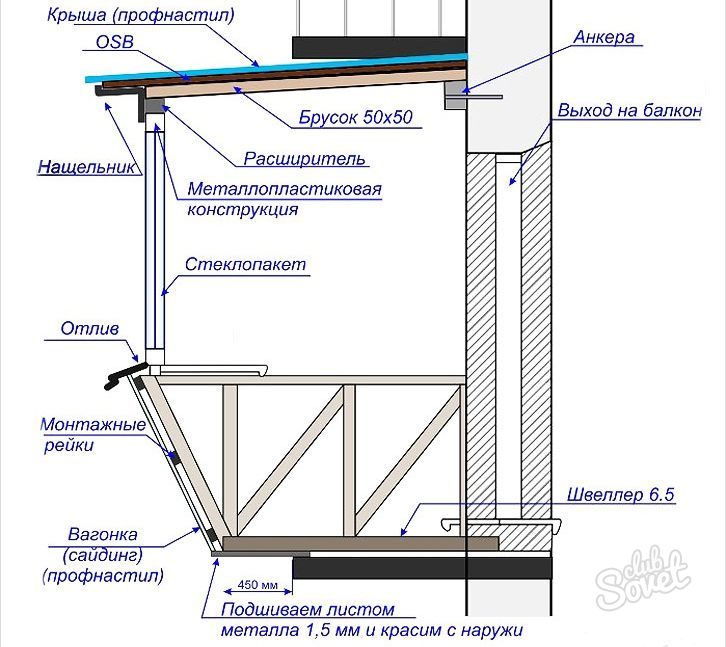
For the construction of the steel frame for glazing, profile pipes or corners with a cross section of 40x40 mm are prepared, and the removal of the floor is made from metal blanks 50x50 or 70x70 mm. You will also need an anchor by 250 mm, bars for crate, straightening, primer and paint.
Required tools:
- Drill drill;
- Bulgarian;
- Hammer;
- Small lomik;
- Welding inverter;
- Measuring supplies.
Balcony space is released, with a removal device on the stove dismantle the old railing. The expansion from the windowsill can be installed on the old parapet, making sure its reliability and amplifying if necessary.

Making framework
Work on the construction of the carrier frame is performed as follows:
- Bulgarian cut slices of profile of the desired length.
- Decaying the blanks on the plate of the balcony with a pitch of 40 cm, "stick" with their welding at one point.
- Expose profile by level, weld in second place.
- Repeatedly check the horizontal parts, if necessary - be bought with a hammer or bent into the mount.
- Finally weld the joints, controlling the quality of the seams.
- Cut from the dimensions of the jumper and fix them with welding.
- Holes drill in profiles adjacent to the wall, and install anchor bolts.
- Mounted on the perimeter of the rack balcony, which serve as a roof support and a frame for window blocks.
- Slag with welded joints, cover the structure of the primer.

Facing the carcass
The finished steel frame is finished first from the outside, using metal corners or wooden bars for the crate. Clean the facade of a straightened or vinyl siding. After completion of the outer finish do glazed and arrangement of an updated balcony.

The discussed works are performed with the assistant, remembering the compliance of security rules.


