Restoring broken sectors will help extend the life of your hard drive and even restore some previously lost files. However, you should remember that this is a responsible and rather risky business, since by pressing the wrong buttons, you can ruin your hard drive at all. Follow strictly according to the instructions presented in this article, and you can restore some broken sectors. Before starting work, select the software with which you will restore sectors. There are many convenient programs for your choice: Victoria, HDAT2, HDDREGENERATOR.
How to restore the broken sectors of a hard drive using HDAT2
Working with this utility implies the presence of a boot disk, or a boot flash drive. How can you record them, you will find out in another article How to make a bootable flash drive. The Daemon Tools or Ultra ISO program should be installed on your computer.
- Download the HDAT2 program from the official site https://hdat2.com.
- You need a section “CD/DVD Boot ISO”.
- Download the latest version that is in ISO format, not SFX.

- In the loading folder, find your file and open it using Daemon Tools, or another software for mounting images.

- Take a clean disk and click on the field “Write the image to the disk”.

Please note that all your further work with this utility will be completely held in the BIOS. Read carefully to the fields that you press.
- To get started, turn off the computer and enter the BIOS. Each computer brand has its own entry buttons to the system. Try to pinch F12 or F7, or better read it on the Internet.
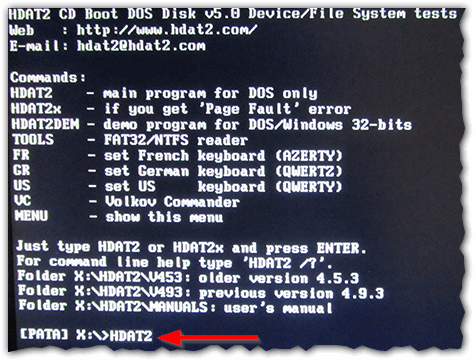
- Entering the BIOS, select the method of loading the system - CD/DVD, and then, enter the HDAT2 command as in the screenshot below.
- After that, a menu with hard disks that are connected to your computer will appear in front of you. If he is alone, then you should not have any problems with the choice. Click on your hard drive and press Enter.
- In the window that appears, select the “Hidden Areas Menu” line.

- Now test your computer on broken sectors. Even if you know their exact number, you still have to perform the test, since the program needs this to further eliminate the problem. Press PowerFul Test Read/Write/Read/Compare

- That's all. Click on the very first line, as shown in the screenshot to fix your sectors. Keep in mind that it will take a long time, so you can push the laptop aside and go about your business. As soon as the program finished working with BAD sectors, do not forget to return the system loading not from CD, but from the hard drive.

How to restore the broken sectors of a hard drive using HDD Regenerator
Starting to work with this utility, you can read a voluminous article about its work in order to roughly imagine the structure of the program: How to use Regenerator HDD. Plus, the utilities are that you do not have to create a boot flash drive or disk and go from under the BIOS. Experienced users note that this program really corrects the problem by demagnetization, and not just disconnects bad sectors.
Download the program on the Internet, keep in mind that only its first use is free. If you want to treat the broken sectors again, then you will have to buy software.
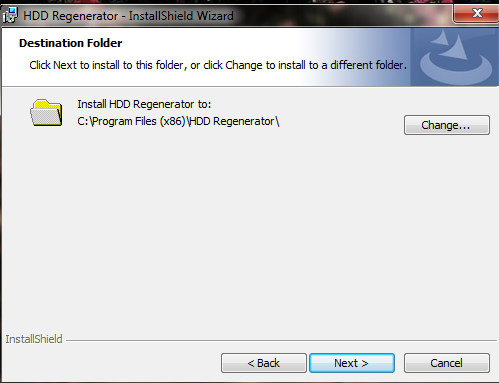
The installation of the program takes a matter of seconds.
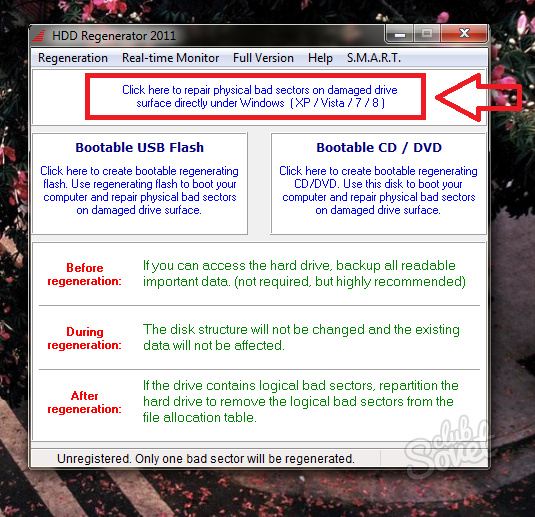
Look carefully at the window interface:
- The left button “Bootable USB Flash” will help you create a bootable flash drive to work with the program in the BIOS.
- The right “bootable CD/DVD” creates a boot disk for the same purposes.
- The upper line allows you to work from under the Windows axis, which saves time very much.
Click on the top line.
Choose your hard drive. It will write a model, the amount of memory and all sectors. Just click twice over it.

Please note that all windows should be closed, and all processes are stopped. Only then can you start working with sectors - the hard drive should be unloaded as much as possible.
Select the second point in the menu that appears - “Normal Scan (with/without repair)”. This option repairs broken sectors right during the scan of all sectors of the hard drive. Please note that the mouse does not work in this program. You need to enter the number 2, and then press Enter.

Now you need a “Scan and Repair” item to confirm the intention to fix all sectors. Enter the number 1.
You can also enter the number 3 to activate the “Regenerate All Sectors” item. This option is preventing absolutely all sectors, even if they are not broken. This is more suitable for experienced users who can independently cope with possible problems in the regeneration process.

Now you have to choose the start of scanning:
- The point under the number 1 “Start secretor 0” begins a scan and treatment from the very beginning.
- The second version of “Start SecTOR ***” continues the past scan if it was interrupted for one reason or another.
- And the third point “Set Start /End Sectors Manully” allows you to enter the range of sector checks manually.
It is better to start from the very beginning, choosing the first point.

The process will start instantly, you just have to wait.