The presence of a gap between the wall and the border of the bath - the situation is quite common. This gap should immediately close up so that the water does not flow to the floor during the soul. Consider the most popular ways to help do it.
Causes of gap
The gaps between the bathroom and the wall arise in such situations:
- Due to the irregularities present on the walls and the floor. All defects must be removed before mounting the bath.
- In case of errors when laying the tile on the wall. The clearance appears when the work is incorrect: first you need to make the floor indoors, then install the bath, and then squeeze the walls with tiles, which will rely on the edges of the bath.
- Such a banal option is possible when the bath itself is crooked, then you do not have to carry out any additional work, except to adjust the legs of the design.
- The bath is chosen incorrectly, namely, its sizes do not correspond to the size of the room. In this case, you will have to buy a new product.
- The geometry that has a bathroom does not comply with the standards. As a rule, these are situations when the walls are crossed at right angles.

Methods of elimination of cracks
In the presence of a gap, the method of eliminating it is taken to choose, depending on the size of the slot.
Slot to 3 mm
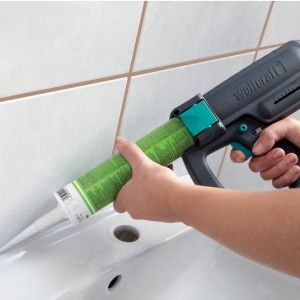
If the size of the gap does not exceed 3 mm, then you will need a sealant made on silicone base, as well as a mounting gun. Fill the seam with the material, moving it subsequently with the help of a vet. If the gap has a large size, then one silicone can not do. You should correctly choose a finishing material that is used for additional sealing of the joint.

Clearance up to 10 mm
If a small gap is formed between the border and the surface of the walls, which does not reach 10 millimeters, then it is recommended to act in accordance with such instructions:
- Prepare an outer white corner, designed for tiles, and a sanitary silicone is needed for attachment, also white.
- Measure the product so that it exactly approached the size of the bath, and cut it at an angle of 45 degrees. For stooling, we use stublog.
- After that, the slit formed between the side and the wall is filled with silicone. The material will be required so much so that it gets out the outside of the corner.
- From above, a plastic corner is fixed using silicone or appropriate glue.
- Remove silicone surplus using a cotton wet rag for this.
Note. When working with silicone, the bath should remain under load for some time after climbing the gap. To do this, fill it with water and leave so about 12 hours until silicone dry out.

Gap 10-30 mm
To eliminate the gap, the size of which fluctuates in the range of 10-30 mm, the usual corners will not fit, since their width, as a rule, does not exceed 12 mm, but are applied as follows:
- Buy a self-adhesive border for sealing the gap or you can use a special plinth made of plastic.
- Do not forget to pre-degrease the surface, and then wait for their complete drying.
- The slit, the size of which is more than 1 centimeter, you will not be able to blew with silicone completely, so it's simply high quality glue the product to the wall and bath.
- The procedure for mounting the border is similar to the installation of the corner. Silicone or suitable adhesive composition is used for fixing. The gluing process itself does not represent anything difficult, but there are some features. A protective film is present on the plinth, it is not recommended to be removed prematurely. First remove it on one side and fix the product to the bath, before starting fixing the second hand, remove the film and glue the plinth to the wall.
- When installing a plastic plinth to the wall, it is necessary to fix special fasteners that are intended for internal installation - klyamimers. Plinth is fixed on them.

Large gaps 30 mm
If the gap exceeds 30 millimeters, then the two previous ways will not fit, and you will have to go to a more time-consuming method - concreting. First you need to build a design that resembles a formwork, and install it under the bath to prevent the solution from entering it. The gap between the wall and the bath should be additionally strengthened by reinforcing. To do this, the walls are driven by the segments of reinforcement, withstanding a step that is 150 millimeters. Next, fill in the deepening solution and wait until it dry. And finally, put on top of the tile, harmonizing with a bath finish. This finish successfully simulates decorative thresholds. Perform work so that the garbage does not get into the bath.

Thus, when solving the issue, this clearance should be guided. At the same time, regardless of the method of eliminating the gap, it is worth it to achieve tightness.