As soon as the autumn time comes, in kindergartens and schools, various kinds of exhibitions, contests and other competitions begin. Let's talk about what you can create the original autumn craft for kindergarten and find out all the nuances of this process.
Nuances of the process of creating autumn crafts
Autumn gives us the opportunity to acquire the necessary materials for free, of which we can make very beautiful crafts. Of course, these are natural materials - leaves, branches, chestnuts, fruits of various trees, etc.

This means that special cash costs are not expected to create autumn crafts, which cannot but rejoice manufacturers. This item can also be included in the list of advantage of the process of creating crafts with your own hands, so it is safe to say that it will be more expensive to buy some craft in any case.
The main components of the future autumn craft can be:
- justice
- shishki.
- leaves of different colors and sizes
- fruits with trees
- berries
- moss
- sprigs, etc.
Today, on the Internet, you can find a huge variety of different crafts, the subject of which is autumn, but this factor does not become useful, and even, on the contrary, because there are eyes in such a variety, and you do not know what kind of craft to choose for your own manufacture.
First of all, you must decide on the level of difficulty crafts to calculate your strength - how much time you are ready to spend on making and how difficult you want your handicap, and only after that it starts to consider the necessary materials and tools.
Let's look at the options for creating the original, but at the same time quite simple autumn crafts, for which there will be no money in the money costs, and also do not need to spend a lot of time and effort.
Pumpkin with flowers
In addition to the fact that you are in the garden or landing (if there is no forest nearby) you can collect cones, acorns and leaves, can also be used for crafts and pumpkins. Even if you do not have your land plot, in the fall, find a pumpkin on the market is not a problem, especially since it is worthwhile penny.
Let's first deal with materials and tools that will be useful in the process of creating autumn crafts:
- Pumpkin (you need it to be smooth and with brightly released slices)
- Pencil, tassels and paints (in this case, the ray of all use the gouache, it goes well on pumpkins)
- Bouquet of autumn colors, twigs and leaves (no need to buy them in the store, just collect such a bouquet on the street)
- Knife and spoon
- Bottle of plastic and knife

When you have all the necessary materials on your hand, we can proceed to the immediate manufacture of our autumn crafts:
- We go to the street, in the forest or the nearest forest stitch and collect the autumn bouquet. Everything is suitable here that you can collect and disrupt - twigs with leaves, spikelets of wheat, asters and other autumn flowers. You can also turn on the bouquet and sunflowers, branches with rowan, etc. Now the bouquet is still set aside.
- First you need to wash the pumpkin and wipe it dry. Pumpkin should be clean. It is also worth noting that the moment that when choosing a pumpkin, attention must be paid to the symmetry of pumpkins, that is, so that it can be without a substrate and stand stand on the table.
- Take a plastic bottle and cut her neck with scissors or knife. How it will be more convenient for you. The height of the cut determines the height of the pumpkin itself, in general, it is necessary to cut the bottle so that it cannot be visible from the pumpkin. For those who have not yet understood, the bottle will become a vase for our bouquet, and the pumpkin is "framed", that is, a decorative decoration.
- Now it will be necessary to cut the top of the pumpkin carefully with a knife (where it is the tail). The cut size should be such that the lower part of the plastic bottle is fit there.
- The next stage is removed with the spoon and the pumpkin's inside knife, freeing the space for the plastic bottle. It is necessary to do this very carefully so as not to break the walls of the pumpkin and do not cut too many internships. It is also worth noting that pumpkin flesh does not need to be thrown away, because it can be baked in an oven with honey or sugar (it turns out very tasty).
- When you have freed the place inside the pumpkin so much that a cropped bottle is placed there, and "comes" there tightly, you can stop getting the insides of the vegetable.
- The next stage is a pumpkin decor. Here you can apply a variety of elements and parts, including beads, rhinestones, buttons, etc., but for example, we will reflect our pumpkin gouache.
- Each slice of pumpkins can be disappeared by different colors, then you will get a very fun and bright vase for our autumn bouquet. You can also decorate the entire pumpkin, for example, in white, and draw black large points on it, such a composition looks very good too.
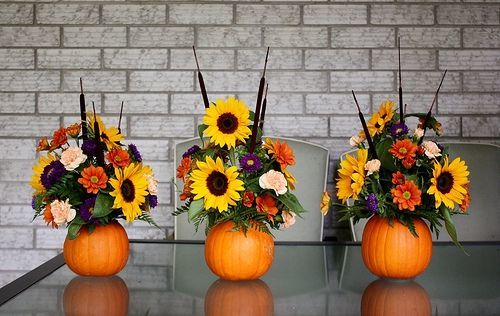
- After you paint our pumpkin paints, let her dry, leave her alone for a while.
- While the paint dries, proceed to the collection of bouquet. We swore all the collected and torn by you, it's beautiful all the component in the bouquet.
- We pour a bit of the waters into the cropped plastic bottle and insert our autumn bouquet there, after which, together with a plastic bottle, we put it in our crooked pumpkin, install it well so that the bottle does not rushing inside the vegetable.
Here is such a beautiful and original handicraft.